Saturday, June 16, 2007

ImageMagickで境界を半透明グラデーションにして2つの画像を重ね合わせる

ImageMagickで境界を半透明グラデーションにして2つの画像を重ね合わせるには、
以下のバッチファイルを実行します。

rem 環境によって変えてね
set im=C:\Progra~1\ImageMagick-6.3.4-Q16
rem 10ピクセルだけ重ねる
%im%\convert.exe sample2bg.jpg -extent 190x100 ( sample3b.jpg -channel A -fx "i<10?i/10:1" ) -geometry +90+0 -composite sample175b.jpg

元画像(sample2bg.jpg)


元画像(sample3b.jpg)


出力画像(sample175b.jpg)


2008/01/04追記
Ver6.3.7では、以下のバッチファイルのように-matteを追加します。
rem 環境によって変えてね
set im=C:\Progra~1\ImageMagick-6.3.7-Q16
rem 10ピクセルだけ重ねる
%im%\convert.exe sample2bg.jpg -extent 190x100 ( sample3b.jpg -matte -channel A -fx "i<10?i/10:1" ) -geometry +90+0 -composite sample175b.jpg

関連項目
ImageMagickで境界を半透明グラデーションにして2つの画像を重ね合わせる - その2
ImageMagickで境界を半透明グラデーションにして2つの画像を重ね合わせる - その3
ImageMagickとPHPで、2つの画像を連結する


Friday, June 15, 2007

ImageMagickでグラデーションのかかった同心円の模様を描画する

ImageMagickでグラデーションのかかった同心円の模様を描画するには、
以下のバッチを実行します。

rem 環境によって変えてね
set im=C:\Progra~1\ImageMagick-6.3.4-Q16

rem 白黒
%im%\convert.exe -size 150x150 xc:white -fx "(cos(sqrt(pow(75-i,2)+pow(75-j,2))/3)+1)/2*0.4+0.6" sample174a.png
rem 2色
%im%\convert.exe -size 150x150 xc:white ( xc:#20c332 xc:#ffff10 +append -resize 2x1 ) -fx "v.p{cos(sqrt(pow(50-i,2)+pow(100-j,2))/7)+1)/2*0.4+0.6,1}" sample174b.jpg

出力画像(sample174a.png)


出力画像(sample174b.jpg)

Tuesday, June 12, 2007

ImageMagickで文字列の中央をへこませる

ImageMagickで文字列の中央をへこませるには、
以下のバッチファイルを実行します。

rem 環境によって変えてね
set im=C:\Progra~1\ImageMagick-6.3.4-Q16

%im%\convert.exe -pointsize 50 -fill #bbddff -font Tahoma label:ImageMagick -virtual-pixel background -background white -fx "p{i,(j-sin(pi*i/w)*0.8*h/2)/(1-sin(pi*i/w)*0.8)}" sample171.jpg

出力画像(sample171.jpg)


関連項目
ImageMagickで文字列の端を絞り込む

Friday, June 08, 2007

ImageMagickで鏡面映り込みを作成する - その4

ImageMagickで鏡面映り込みを作成するには、以下のバッチを実行します。

rem 環境によって変えてね
set im=C:\Progra~1\ImageMagick-6.3.4-Q16
rem 右側を若干暗くなるようにグラデーション適用
%im%\convert.exe sample4.jpg -fx "p*(1-i/(w*4))" -bordercolor #c0c0c0 -border 1x1 -channel RGBA sample4t.png
rem 反転&グラデーションをかけて
%im%\convert.exe sample4t.png -fx "p*j/h*0.8" -flip sample4t2.png
rem 縦に連結+台形変形+傾け
%im%\convert.exe sample4t.png sample4t2.png -append -virtual-pixel background -background black -fx "p{i*1.1,(j*w-i*h*0.05)/(w-i*0.1)}" -background none -shear 0x350 -gravity center -extent 220x220 sample170a.jpg

元画像(sample4.jpg)


出力画像(sample170a.jpg)

ImageMagickで画像を丸型に切り取って点線が回転するGIFアニメーションを作成する

ImageMagickで画像を丸型に切り取って点線が回転するGIFアニメーションを作成するには、
以下のバッチファイルを実行します。

rem 環境によって変えてね
set im=C:\Progra~1\ImageMagick-6.3.4-Q16
%im%\convert.exe -size 100x100 xc:none -fill white -draw "circle 50,50 50,2" sample3b.jpg -compose srcin -composite -strokewidth 2 -fill none -stroke #c0b49d -draw "stroke-dasharray 4,4 stroke-dashoffset 7 circle 50,50 50,3" f1.png
%im%\convert.exe -size 100x100 xc:none -fill white -draw "circle 50,50 50,2" sample3b.jpg -compose srcin -composite -strokewidth 2 -fill none -stroke #c0b49d -draw "stroke-dasharray 4,4 stroke-dashoffset 6 circle 50,50 50,3" f2.png
%im%\convert.exe -size 100x100 xc:none -fill white -draw "circle 50,50 50,2" sample3b.jpg -compose srcin -composite -strokewidth 2 -fill none -stroke #c0b49d -draw "stroke-dasharray 4,4 stroke-dashoffset 5 circle 50,50 50,3" f3.png
%im%\convert.exe -size 100x100 xc:none -fill white -draw "circle 50,50 50,2" sample3b.jpg -compose srcin -composite -strokewidth 2 -fill none -stroke #c0b49d -draw "stroke-dasharray 4,4 stroke-dashoffset 4 circle 50,50 50,3" f4.png
%im%\convert.exe -size 100x100 xc:none -fill white -draw "circle 50,50 50,2" sample3b.jpg -compose srcin -composite -strokewidth 2 -fill none -stroke #c0b49d -draw "stroke-dasharray 4,4 stroke-dashoffset 3 circle 50,50 50,3" f5.png
%im%\convert.exe -size 100x100 xc:none -fill white -draw "circle 50,50 50,2" sample3b.jpg -compose srcin -composite -strokewidth 2 -fill none -stroke #c0b49d -draw "stroke-dasharray 4,4 stroke-dashoffset 2 circle 50,50 50,3" f6.png
%im%\convert.exe -size 100x100 xc:none -fill white -draw "circle 50,50 50,2" sample3b.jpg -compose srcin -composite -strokewidth 2 -fill none -stroke #c0b49d -draw "stroke-dasharray 4,4 stroke-dashoffset 1 circle 50,50 50,3" f7.png
%im%\convert.exe -size 100x100 xc:none -fill white -draw "circle 50,50 50,2" sample3b.jpg -compose srcin -composite -strokewidth 2 -fill none -stroke #c0b49d -draw "stroke-dasharray 4,4 stroke-dashoffset 0 circle 50,50 50,3" f8.png
%im%\convert.exe -set delay 10 f1.png f2.png f3.png f4.png f5.png f6.png f7.png f8.png -loop 0 sample166.gif

元画像(sample3b.jpg)


出力画像(sample166.gif)


Tuesday, June 05, 2007

ImageMagickで画像を三角形・台形に変形する

ImageMagickで画像を三角形・台形に変形するには、
以下のバッチを実行します。

元画像(sample8.jpg)


rem 環境によって変えてね
set im=C:\Progra~1\ImageMagick-6.3.4-Q16
rem 右三角%im%\convert.exe sample8.jpg -virtual-pixel background -background white -fx "p{i,(j*w-i*h*0.5)/(w-i)}" sample169a.png


出力画像(sample169a.png)


rem 右台形
%im%\convert.exe sample8.jpg -virtual-pixel background -background white -fx "p{i,(j*w-i*h*0.25)/(w-i*0.5)}" sample169b.png

出力画像(sample169b.png)


rem 左三角
%im%\convert.exe sample8.jpg -virtual-pixel background -background white -fx "p{i,(j*w-(w-i)*h*0.5)/(i+1)}" sample169c.png

出力画像(sample169c.png)


rem 左台形
%im%\convert.exe sample8.jpg -virtual-pixel background -background white -fx "p{i,(j*w-(w-i)*h*0.25)/((w+i)*0.5)}" sample169d.png

出力画像(sample169d.png)


rem 下三角
%im%\convert.exe sample8.jpg -virtual-pixel background -background white -fx "p{(i*h-j*w*0.5)/(h-j),j}" sample169e.png

出力画像(sample169e.png)


rem 下台形
%im%\convert.exe sample8.jpg -virtual-pixel background -background white -fx "p{(i*h-j*w*0.25)/(h-j*0.5),j}" sample169f.png

出力画像(sample169f.png)


rem 上三角
%im%\convert.exe sample8.jpg -virtual-pixel background -background white -fx "p{(i*h-(h-j)*w*0.5)/(j+1),j}" sample169g.png

出力画像(sample169g.png)


rem 上台形
%im%\convert.exe sample8.jpg -virtual-pixel background -background white -fx "p{(i*h-(h-j)*w*0.25)/((h+j)*0.5),j}" sample169h.png

出力画像(sample169d.png)


関連項目
ImageMagickで台形変形を行う

Thursday, May 31, 2007

ImageMagickで特定の色調のモノトーンビデオ風画像に変換する

ImageMagickで特定の色調のモノトーンビデオ風画像に変換するには、
以下のバッチファイルを実行します。

rem 環境によって変えてね
set im=C:\Progra~1\ImageMagick-6.3.4-Q16
%im%\convert.exe sample8.jpg +contrast +contrast -fx "j%%3!=0?(r*0.8+g*0.8+b*1.4)/3*#7090E0:(r*0.8+g*0.8+b*1.4)/3*0.7*#7090E0" sample168a.png

元画像(sample8.jpg)


出力画像(sample168a.png)

Wednesday, May 30, 2007

ImageMagickで上下左右方向に徐々にモーションブラーをかける

ImageMagickで上下左右方向に徐々にモーションブラーをかけるには、
以下のバッチファイルを実行します。

rem 環境によって変えてね
set im=C:\Progra~1\ImageMagick-6.3.4-Q16
rem 右に徐々にモーションブラー
%im%\convert.exe sample8.jpg -motion-blur 0x20+180 ( sample8.jpg -channel RGBA -fx "i<w*8/10?p:0" -motion-blur 0x10+180 ) ( sample8.jpg -channel RGBA -fx "i<w*6/10?p:0" -motion-blur 0x5+180 ) ( sample8.jpg -channel RGBA -fx "i<w*4/10?p:0" -motion-blur 0x2+180 ) ( sample8.jpg -channel RGBA -fx "i<w*2/10?p:0" ) -flatten sample167a.png

元画像(sample8.jpg)


出力画像(sample167a.png)


rem 左に徐々にモーションブラー
%im%\convert.exe sample8.jpg -motion-blur 0x20+0 ( sample8.jpg -channel RGBA -fx "i>w*2/10?p:0" -motion-blur 0x10+0 ) ( sample8.jpg -channel RGBA -fx "i>w*4/10?p:0" -motion-blur 0x5+0 ) ( sample8.jpg -channel RGBA -fx "i>w*6/10?p:0" -motion-blur 0x2+0 ) ( sample8.jpg -channel RGBA -fx "i>w*8/10?p:0" ) -flatten sample167b.png

出力画像(sample167b.png)

rem 下に徐々にモーションブラー
%im%\convert.exe sample8.jpg -motion-blur 0x20+270 ( sample8.jpg -channel RGBA -fx "j<h*8/10?p:0" -motion-blur 0x10+270 ) ( sample8.jpg -channel RGBA -fx "j<h*6/10?p:0" -motion-blur 0x5+270 ) ( sample8.jpg -channel RGBA -fx "j<h*4/10?p:0" -motion-blur 0x2+270 ) ( sample8.jpg -channel RGBA -fx "j<h*2/10?p:0" ) -flatten sample167c.png

出力画像(sample167c.png)

rem 上に徐々にモーションブラー
%im%\convert.exe sample8.jpg -motion-blur 0x20+90 ( sample8.jpg -channel RGBA -fx "j>h*2/10?p:0" -motion-blur 0x10+90 ) ( sample8.jpg -channel RGBA -fx "j>h*4/10?p:0" -motion-blur 0x5+90 ) ( sample8.jpg -channel RGBA -fx "j>h*6/10?p:0" -motion-blur 0x2+90 ) ( sample8.jpg -channel RGBA -fx "j>h*8/10?p:0" ) -flatten sample167d.png

出力画像(sample167d.png)


2008/01/04追記
ver6.3.7では、以下のバッチファイルのように-channelの前に-matteを追加します。

rem 環境によって変えてね
set im=C:\Progra~1\ImageMagick-6.3.7-Q16

rem 右に徐々にモーションブラー
%im%\convert.exe sample8.jpg -motion-blur 0x20+180 ( sample8.jpg
-matte -channel RGBA -fx "i<w*8/10?p:0" -motion-blur 0x10+180 )
( sample8.jpg -matte -channel RGBA -fx "i<w*6/10?p:0" -motion-blur 0x5+180 )
( sample8.jpg -matte -channel RGBA -fx "i<w*4/10?p:0" -motion-blur 0x2+180 )
( sample8.jpg -matte -channel RGBA -fx "i<w*2/10?p:0" ) -flatten sample167a.png

rem 左に徐々にモーションブラー
%im%\convert.exe sample8.jpg -motion-blur 0x20+0 ( sample8.jpg
-matte -channel RGBA -fx "i>w*2/10?p:0" -motion-blur 0x10+0 )
( sample8.jpg -matte -channel RGBA -fx "i>w*4/10?p:0" -motion-blur 0x5+0 )
( sample8.jpg -matte -channel RGBA -fx "i>w*6/10?p:0" -motion-blur 0x2+0 )
( sample8.jpg -matte -channel RGBA -fx "i>w*8/10?p:0" ) -flatten sample167b.png

rem 下に徐々にモーションブラー
%im%\convert.exe sample8.jpg -motion-blur 0x20+270 ( sample8.jpg
-matte -channel RGBA -fx "j<h*8/10?p:0" -motion-blur 0x10+270 )
( sample8.jpg -matte -channel RGBA -fx "j<h*6/10?p:0" -motion-blur 0x5+270 )
( sample8.jpg -matte -channel RGBA -fx "j<h*4/10?p:0" -motion-blur 0x2+270 )
( sample8.jpg -matte -channel RGBA -fx "j<h*2/10?p:0" ) -flatten sample167c.png

rem 上に徐々にモーションブラー
%im%\convert.exe sample8.jpg -motion-blur 0x20+90 ( sample8.jpg
-matte -channel RGBA -fx "j>h*2/10?p:0" -motion-blur 0x10+90 )
( sample8.jpg -matte -channel RGBA -fx "j>h*4/10?p:0" -motion-blur 0x5+90 )
( sample8.jpg -matte -channel RGBA -fx "j>h*6/10?p:0" -motion-blur 0x2+90 )
( sample8.jpg -matte -channel RGBA -fx "j>h*8/10?p:0" ) -flatten sample167d.png

関連項目
ImageMagickで上下左右に画像を徐々にぼかす


Monday, May 28, 2007

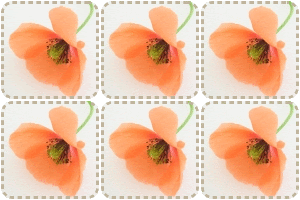
ImageMagickで画像を角丸四角に切り取って点線が回転するGIFアニメーションを作成する

ImageMagickで画像を角丸四角に切り取って、
点線が回転するGIFアニメーションを作成するには、
以下のバッチファイルを実行します。


rem 環境によって変えてね
set im=C:\Progra~1\ImageMagick-6.3.4-Q16
%im%\convert.exe -size 100x100 xc:none -fill white -draw "roundrectangle 1,1 98,98 10,10" sample3b.jpg -compose srcin -composite -strokewidth 2 -fill none -stroke #c0b49d -draw "stroke-dasharray 4,4 roundrectangle 2,2 97,97 10,10" f1.png
%im%\convert.exe -size 100x100 xc:none -fill white -draw "roundrectangle 1,1 98,98 10,10" sample3b.jpg -compose srcin -composite -strokewidth 2 -fill none -stroke #c0b49d -draw "stroke-dasharray 4,4 stroke-dashoffset 1 roundrectangle 2,2 97,97 10,10" f2.png
%im%\convert.exe -size 100x100 xc:none -fill white -draw "roundrectangle 1,1 98,98 10,10" sample3b.jpg -compose srcin -composite -strokewidth 2 -fill none -stroke #c0b49d -draw "stroke-dasharray 4,4 stroke-dashoffset 2 roundrectangle 2,2 97,97 10,10" f3.png
%im%\convert.exe -size 100x100 xc:none -fill white -draw "roundrectangle 1,1 98,98 10,10" sample3b.jpg -compose srcin -composite -strokewidth 2 -fill none -stroke #c0b49d -draw "stroke-dasharray 4,4 stroke-dashoffset 3 roundrectangle 2,2 97,97 10,10" f4.png
%im%\convert.exe -size 100x100 xc:none -fill white -draw "roundrectangle 1,1 98,98 10,10" sample3b.jpg -compose srcin -composite -strokewidth 2 -fill none -stroke #c0b49d -draw "stroke-dasharray 4,4 stroke-dashoffset 4 roundrectangle 2,2 97,97 10,10" f5.png
%im%\convert.exe -size 100x100 xc:none -fill white -draw "roundrectangle 1,1 98,98 10,10" sample3b.jpg -compose srcin -composite -strokewidth 2 -fill none -stroke #c0b49d -draw "stroke-dasharray 4,4 stroke-dashoffset 5 roundrectangle 2,2 97,97 10,10" f6.png
%im%\convert.exe -size 100x100 xc:none -fill white -draw "roundrectangle 1,1 98,98 10,10" sample3b.jpg -compose srcin -composite -strokewidth 2 -fill none -stroke #c0b49d -draw "stroke-dasharray 4,4 stroke-dashoffset 6 roundrectangle 2,2 97,97 10,10" f7.png
%im%\convert.exe -size 100x100 xc:none -fill white -draw "roundrectangle 1,1 98,98 10,10" sample3b.jpg -compose srcin -composite -strokewidth 2 -fill none -stroke #c0b49d -draw "stroke-dasharray 4,4 stroke-dashoffset 7 roundrectangle 2,2 97,97 10,10" f8.png
%im%\convert.exe -set delay 10 f1.png f2.png f3.png f4.png f5.png f6.png f7.png f8.png -loop 0 sample165.gif

元画像(sample3b.jpg)
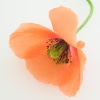


出力画像(sample165.gif)
Sunday, May 27, 2007

ImageMagickで上下左右に画像を徐々にぼかす

ImageMagickで上下左右に画像を徐々にぼかすには、
以下のバッチファイルを実行します。

rem 環境によって変えてね
set im=C:\Progra~1\ImageMagick-6.3.4-Q16
rem 右にぼかしていく場合
%im%\convert.exe sample8.jpg -blur 0x4 ( sample8.jpg -channel RGBA -fx "i<w*8/10?p:0" -blur 0x3 ) ( sample8.jpg -channel RGBA -fx "i<w*6/10?p:0" -blur 0x2 ) ( sample8.jpg -channel RGBA -fx "i<w*4/10?p:0" -blur 0x1 ) ( sample8.jpg -channel RGBA -fx "i<w*2/10?p:0" ) -flatten sample164a.png

元画像(sample8.jpg)


出力画像(sample164a.png)

rem 左にぼかしていく場合
%im%\convert.exe sample8.jpg -blur 0x4 ( sample8.jpg -channel RGBA -fx "i>w*2/10?p:0" -blur 0x3 ) ( sample8.jpg -channel RGBA -fx "i>w*4/10?p:0" -blur 0x2 ) ( sample8.jpg -channel RGBA -fx "i>w*6/10?p:0" -blur 0x1 ) ( sample8.jpg -channel RGBA -fx "i>w*8/10?p:0" ) -flatten sample164b.png

出力画像(sample164b.png)


rem 下にぼかしていく場合
%im%\convert.exe sample8.jpg -blur 0x4 ( sample8.jpg -channel RGBA -fx "j<h*8/10?p:0" -blur 0x3 ) ( sample8.jpg -channel RGBA -fx "j<h*6/10?p:0" -blur 0x2 ) ( sample8.jpg -channel RGBA -fx "j<h*4/10?p:0" -blur 0x1 ) ( sample8.jpg -channel RGBA -fx "j<h*2/10?p:0" ) -flatten sample164c.png

出力画像(sample164c.png)


rem 上にぼかしていく場合
%im%\convert.exe sample8.jpg -blur 0x4 ( sample8.jpg -channel RGBA -fx "j>h*2/10?p:0" -blur 0x3 ) ( sample8.jpg -channel RGBA -fx "j>h*4/10?p:0" -blur 0x2 ) ( sample8.jpg -channel RGBA -fx "j>h*6/10?p:0" -blur 0x1 ) ( sample8.jpg -channel RGBA -fx "j>h*8/10?p:0" ) -flatten sample164d.png

出力画像(sample164d.png)


2008/01/04追記
ver6.3.7では、以下のバッチファイルを実行します。 -channel RGBAの前に-matteを追加しています。

rem 環境によって変えてね
set im=C:\Progra~1\ImageMagick-6.3.7-Q16

rem 右にぼかしていく場合
%im%\convert.exe sample8.jpg -blur 0x4 ( sample8.jpg -matte -channel RGBA
-fx "i<w*8/10?p:0" -blur 0x3 ) ( sample8.jpg -matte -channel RGBA
-fx "i<w*6/10?p:0" -blur 0x2 ) ( sample8.jpg -matte -channel RGBA
-fx "i<w*4/10?p:0" -blur 0x1 ) ( sample8.jpg -matte -channel RGBA
-fx "i<w*2/10?p:0" ) -flatten sample164a.png

rem 左にぼかしていく場合
%im%\convert.exe sample8.jpg -blur 0x4 ( sample8.jpg -matte -channel RGBA
-fx "i>w*2/10?p:0" -blur 0x3 ) ( sample8.jpg -matte -channel RGBA
-fx "i>w*4/10?p:0" -blur 0x2 ) ( sample8.jpg -matte -channel RGBA
-fx "i>w*6/10?p:0" -blur 0x1 ) ( sample8.jpg -matte -channel RGBA
-fx "i>w*8/10?p:0" ) -flatten sample164b.png

rem 下にぼかしていく場合
%im%\convert.exe sample8.jpg -blur 0x4 ( sample8.jpg -matte -channel RGBA
-fx "j<h*8/10?p:0" -blur 0x3 ) ( sample8.jpg -matte -channel RGBA
-fx "j<h*6/10?p:0" -blur 0x2 ) ( sample8.jpg -matte -channel RGBA
-fx "j<h*4/10?p:0" -blur 0x1 ) ( sample8.jpg -matte -channel RGBA
-fx "j<h*2/10?p:0" ) -flatten sample164c.png

rem 上にぼかしていく場合
%im%\convert.exe sample8.jpg -blur 0x4 ( sample8.jpg -matte -channel RGBA
-fx "j>h*2/10?p:0" -blur 0x3 ) ( sample8.jpg -matte -channel RGBA
-fx "j>h*4/10?p:0" -blur 0x2 ) ( sample8.jpg -matte -channel RGBA
-fx "j>h*6/10?p:0" -blur 0x1 ) ( sample8.jpg -matte -channel RGBA
-fx "j>h*8/10?p:0" ) -flatten sample164d.png

Friday, May 25, 2007

ImageMagickでカーブした光沢のある文字列を描画する

ImageMagickでカーブした光沢のある文字列を描画するには、
以下のバッチファイルを実行します。

rem 環境によって変えてね
set im=C:\Progra~1\ImageMagick-6.3.4-Q16
%im%\convert.exe -size 300x80 xc:none -stroke #f8c749 -fill #f8c749 -gravity center -font Tahoma -draw "font-size 50 text 0,0 'ImageMagick'" -fx "(sin(i/w*pi)*h*0.2+h*0.4)>j?#FEF779:p" sample163a.png

出力画像(sample163a.png)


凸形状に光沢をつけるには、以下のコマンドを実行します。
%im%\convert.exe -size 300x80 xc:none -stroke #f8c749 -fill #f8c749 -gravity center -font Tahoma -draw "font-size 50 text 0,0 'ImageMagick'" -fx "(h*0.2-sin(i/w*pi)*h*0.2+h*0.5)>j?#FEF779:p" sample163b.png

出力画像(sample163b.jpg)


関連項目

ImageMagickで右方向へだんだんと白黒画像になっていくグラデーションを作成する

ImageMagickで右方向へだんだんと白黒画像になっていくグラデーションを作成するには、
以下のバッチファイルを実行します。

rem 環境によって変えてね
set im=C:\Progra~1\ImageMagick-6.3.4-Q16
%im%\convert.exe sample10.jpg -channel A -fx "i<(w/3)?1:((w-w/3)-(i-w/3))/(w-w/3)" t1.png %im%\convert.exe sample10.jpg -fx "(r+g+b)/3" t1.png -composite sample162.jpg

上記バッチファイルでは、画像幅の1/3から徐々に白黒画像になっていきます。

元画像(sample10.jpg)


出力画像(sample162.jpg)


2008/01/04追加
ver6.3.7では、以下のバッチファイルのように-channelの前に-matteを追加します。

rem 環境によって変えてね
set im=C:\Progra~1\ImageMagick-6.3.7-Q16
%im%\convert.exe sample10.jpg -matte -channel A -fx "i<(w/3)?1:((w-w/3)-(i-w/3))/(w-w/3)" t1.png
%im%\convert.exe sample10.jpg -fx "(r+g+b)/3" t1.png -composite sample162.jpg
rem 上記と同様の処理を1回の実行で行う
%im%\convert.exe sample10.jpg -fx "(r+g+b)/3" ( sample10.jpg -matte -channel A -fx "i<(w/3)?1:((w-w/3)-(i-w/3))/(w-w/3)" ) -composite sample162b.jpg

関連項目
ImageMagickでだんだんと白黒画像になっていくグラデーションを作成する

Wednesday, May 23, 2007

ImageMagickで画像に影付けして複数方向にモーションブラーをかける

ImageMagickで画像に影付けして複数方向にモーションブラーをかけるには、
以下のバッチを実行します。

rem 環境によって変えてね
set im=C:\Progra~1\ImageMagick-6.3.4-Q16
%im%\convert.exe -size 150x150 xc:#ffffff ( sample2.png -background none -gravity center -extent 150x150 ) ( +clone -background #bbddff -shadow 80x2+0+0 -motion-blur 0x20+225 ) +swap ( +clone -background #bbddff -shadow 80x2+3+3 -motion-blur 0x20+105 ) +swap ( +clone -background #bbddff -shadow 80x2+3+3 -motion-blur 0x20+345 ) +swap -mosaic sample161a.jpg

上記のバッチでは、225度、105度、345度にモーションブラーをかけています。

元画像(sample2.png)


出力画像(sample161a.jpg)

Saturday, May 19, 2007

ImageMagickで透過PNGのエッジ抽出画像を生成する

ImageMagickで透過PNGのエッジ抽出画像を生成するには、
以下のバッチファイルを実行します。

rem 環境によって変えてね
set im=C:\Progra~1\ImageMagick-6.3.4-Q16
%im%\convert.exe sample9b.jpg -enhance -enhance -enhance -enhance -enhance -edge 2 -threshold 50%% -channel A -fx "p.r==1?1:0" -channel RGB -fx "p==1?#2050C0:0" -channel RGBA -blur 1 sample160.png
%im%\convert.exe sample9b.jpg -fx "(r+g+b)/3" sample160.png -composite sample160b.png

元画像(sample9b.jpg)


出力画像(sample160.png)


白黒画像と重ねあわせた例(sample160b.png)

ImageMagickでだんだんと白黒画像になっていくグラデーションを作成する

ImageMagickでだんだんと白黒画像になっていくグラデーションを作成するには、
以下のバッチファイルを実行します。

rem 環境によって変えてね
set im=C:\Progra~1\ImageMagick-6.3.4-Q16
%im%\convert.exe sample10.jpg -channel A -fx "1-sqrt(pow(150-i,2)+pow(50-j,2))/100" t1.png
%im%\convert.exe sample10.jpg -fx "(r+g+b)/3" t1.png -composite sample159.jpg

上記のバッチでは、座標(150,50)から遠ざかるほどに白黒画像になります。

元画像(sample10.jpg)


出力画像(sample159.jpg)

ImageMagickで一部分だけ焦点のあっている画像に処理する

ImageMagickで一部分だけ焦点のあっている画像に処理するには、
以下のバッチファイルを実行します。

rem 環境によって変えてね
set im=C:\Progra~1\ImageMagick-6.3.4-Q16
%im%\convert.exe -size 200x100 xc:none -fill white -draw "ellipse 50,50 40,40 0,360" sample8.jpg -compose srcin -composite p1.png
%im%\convert.exe -size 200x100 xc:none -fill white -draw "ellipse 50,50 45,45 0,360" sample8.jpg -compose srcin -composite -channel RGBA -blur 0x1 p2.png
%im%\convert.exe -size 200x100 xc:none -fill white -draw "ellipse 50,50 55,55 0,360" sample8.jpg -compose srcin -composite -channel RGBA -blur 0x2 p3.png
%im%\convert.exe -size 200x100 xc:none -fill white -draw "ellipse 50,50 70,70 0,360" sample8.jpg -compose srcin -composite -channel RGBA -blur 0x3 p4.png
%im%\convert.exe sample8.jpg -blur 0x4 p4.png p3.png p2.png p1.png -flatten sample158.png

上記のバッチでは、座標(50,50)を中心とした同心円をそれぞれ切り抜き、ぼかしを外側に向かって
強くかけるようにしています。

元画像(sample8.jpg)


出力画像(sample158.png)

ImageMagickで画像の上下を半透明グラデーションにする

ImageMagickで画像の上下を半透明グラデーションにするには、
以下のバッチファイルを実行します。

rem 環境によって変えてね
set im=C:\Progra~1\ImageMagick-6.3.4-Q16
%im%\convert.exe sample3b.jpg -channel A -fx "abs(sin(pi*j/h))" sample157a.png
%im%\convert.exe -size 150x150 pattern:checkerboard -gravity center sample157a.png -composite sample157b.jpg

元画像(sample3b.jpg)


出力画像(sample157a.png)


重ねあわせ例(sample157b.jpg)


2008/01/04追記
ver6.3.7では、以下のバッチファイルのように-channelの前に-matteを追加します。
rem 環境によって変えてね
set im=C:\Progra~1\ImageMagick-6.3.7-Q16
%im%\convert.exe sample3b.jpg -matte -channel A -fx "abs(sin(pi*j/h))" sample157a.png
%im%\convert.exe -size 150x150 pattern:checkerboard -gravity center sample157a.png -composite sample157b.jpg

関連項目
ImageMagickで上下・左右に半透明グラデーションをかける

Friday, May 11, 2007

ImageMagickとVBS(WSH)でポラロイド写真を並べた画像を生成する

ImageMagickとVBS(WSH)でポラロイド写真を並べた画像を生成するには、
以下のpolaroids.vbsを実行します。

cscript polaroids.vbs sample156.jpg sample3b.jpg sample4.jpg sample5.jpg sample6.jpg sample9b.jpg
polaroids.vbs
----------------------------------------------------------------------------

Set im = CreateObject("ImageMagickObject.MagickImage.1")
pi=3.14159
rem 開始角
sa=-30
rem 終了角
ea=30
rem 半径
rad=150
rem 出力サイズx
ox=300
oy=200

da=abs(sa-ea)/(WScript.Arguments.Count-2)
WScript.StdOut.WriteLine da
ra = sa
ofile = WScript.Arguments(0)


im.Convert "-size", ox & "x" & oy, "gradient:#ffffff-#bbddff", ofile
For wl=1 to WScript.Arguments.Count -1
infile = WScript.Arguments(wl)
outfile = WScript.Arguments(wl) & ".png"
WScript.StdOut.WriteLine "infile:" & infile
WScript.StdOut.WriteLine "outfile:" & outfile
WScript.StdOut.WriteLine "ra:" & ra
im.Convert infile, "-background", "none", "-polaroid", ra, "+repage", outfile

gx = int(rad * cos(2*pi*(ra+270)/360))
gy = int(rad * sin(2*pi*(ra+270)/360))
width = im.identify("-format", "%w", outfile)
height = im.identify("-format", "%h", outfile)
WScript.StdOut.WriteLine "width:" & width
agx = gx -width/2 +ox/2
agy = gy -height/3 +oy
if agx > 0 then sgx = "+" & agx else sgx = "" & agx end if
if agy > 0 then sgy = "+" & agy else sgy = "" & agy end if

im.Convert ofile, outfile, "-geometry", sgx & sgy, "-composite", ofile


ra=ra+da
Next
Set im = Nothing
----------------------------------------------------------------------------

出力画像(sample156.jpg)


関連項目
ImageMagickとWSHで、バッジ画像を生成する
ImageMagickで、画像をポラロイド写真風にして、日本語文字列を描画する