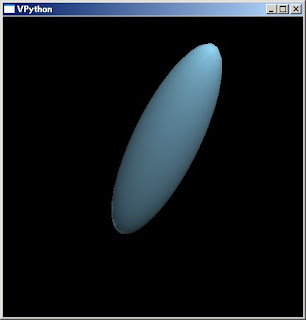
# coding=UTF-8
from visual import *
# 楕円を作成
ellipsoid1 = ellipsoid(pos=(0, 0, 0), size=(2,0.5,0.5),
color=(0x99/255.,0xdd/255.,0xff/255.))
# 回転
ellipsoid1.rotate(angle=pi*110./180., axis=(1,0,1))
出力画面

動作環境
Python 3.1.3, VPython 5.41
<!DOCTYPE html PUBLIC "-//W3C//DTD XHTML 1.0 Strict//EN"
  "http://www.w3.org/TR/xhtml1/DTD/xhtml1-strict.dtd">
<html xmlns="http://www.w3.org/1999/xhtml" lang="ja"
  xml:lang="ja" dir="ltr">
<head>
<title>gd_test7</title>
</head>
<body>
<?php
// 入力ファイル名
$fn = "sf.jpg";
// 入力ファイルサイズ取得
$bimg = imagecreatefromjpeg($fn);
//imagefilter($bimg, IMG_FILTER_GRAYSCALE);
$sx = imagesx($bimg);
$sy = imagesy($bimg);

$img = imagecreatetruecolor($sx, $sy);
imagesavealpha($img, true);
imagealphablending($img, false);
// 半透明のノイズをかける
for($ly=0;$ly<$sy;$ly++){
  for($lx=0;$lx<$sx;$lx++){
    $pa = rand(5,40);
    $px = imagecolorat($bimg, $lx, $ly);
    $pr = ($px >> 16) & 0xff;
    $pg = ($px >> 8 ) & 0xff;
    $pb = $px & 0xff;
    imagesetpixel($img, $lx, $ly,
      imagecolorresolvealpha($img, $pr, $pg, $pb, $pa));
  }
}
// ファイル出力
imagepng($img, "gd_test7.png");
// 開放
imagedestroy($img);
imagedestroy($bimg);
?>
<img src="gd_test7.png" /><br />
</body>
</html>


<!DOCTYPE html PUBLIC "-//W3C//DTD XHTML 1.0 Strict//EN"
  "http://www.w3.org/TR/xhtml1/DTD/xhtml1-strict.dtd">
<html xmlns="http://www.w3.org/1999/xhtml" lang="ja"
  xml:lang="ja" dir="ltr">
<head>
<title>gd_test6</title>
</head>
<body>
<?php
// 入力ファイル名
$fn = "sf.jpg";
// 入力ファイルサイズ取得
$bimg = imagecreatefromjpeg($fn);
//imagefilter($bimg, IMG_FILTER_GRAYSCALE);
$sx = imagesx($bimg);
$sy = imagesy($bimg);

$img = imagecreatetruecolor($sx, $sy);
imagesavealpha($img, true);
imagealphablending($img, false);
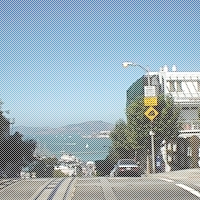
// 半透明の網掛けをかける
for($ly=0;$ly<$sy;$ly++){
  for($lx=0;$lx<$sx;$lx++){
    $pa = (($ly + $lx)% 2 == 0)?0:0x40;
    $px = imagecolorat($bimg, $lx, $ly);
    $pr = ($px >> 16) & 0xff;
    $pg = ($px >> 8 ) & 0xff;
    $pb = $px & 0xff;
    imagesetpixel($img, $lx, $ly,
      imagecolorresolvealpha($img, $pr, $pg, $pb, $pa));
  }
}
// ファイル出力
imagepng($img, "gd_test6.png");
// 開放
imagedestroy($img);
imagedestroy($bimg);
?>
<img src="gd_test6.png" /><br />
</body>
</html>


<!DOCTYPE html PUBLIC "-//W3C//DTD XHTML 1.0 Strict//EN"
  "http://www.w3.org/TR/xhtml1/DTD/xhtml1-strict.dtd">
<html xmlns="http://www.w3.org/1999/xhtml" lang="ja"
  xml:lang="ja" dir="ltr">
<head>
<title>gd_test5</title>
</head>
<body>
<?php
// 入力ファイル名
$fn = "sf.jpg";
// 入力ファイルサイズ取得
$bimg = imagecreatefromjpeg($fn);
//imagefilter($bimg, IMG_FILTER_GRAYSCALE);
$sx = imagesx($bimg);
$sy = imagesy($bimg);

$img = imagecreatetruecolor($sx, $sy);
imagesavealpha($img, true);
imagealphablending($img, false);
// 半透明のストライプの入った画像を作成
for($ly=0;$ly<$sy;$ly++){
  $pa = ($ly % 2 == 0)?0:0x30;
  for($lx=0;$lx<$sx;$lx++){
    $px = imagecolorat($bimg, $lx, $ly);
    $pr = ($px >> 16) & 0xff;
    $pg = ($px >> 8 ) & 0xff;
    $pb = $px & 0xff;
    imagesetpixel($img, $lx, $ly,
      imagecolorresolvealpha($img, $pr, $pg, $pb, $pa));
  }
}
// ファイル出力
imagepng($img, "gd_test5.png");
// 開放
imagedestroy($img);
imagedestroy($bimg);
?>
<img src="gd_test5.png" /><br />
</body>
</html>


<!DOCTYPE html PUBLIC "-//W3C//DTD XHTML 1.0 Strict//EN"
  "http://www.w3.org/TR/xhtml1/DTD/xhtml1-strict.dtd">
<html xmlns="http://www.w3.org/1999/xhtml" lang="ja"
  xml:lang="ja" dir="ltr">
<head>
<title>gd_test4</title>
</head>
<body>
<?php
// 入力ファイル名
$fn = "sf.jpg";
// 入力ファイルサイズ取得
$bimg = imagecreatefromjpeg($fn);
imagefilter($bimg, IMG_FILTER_GRAYSCALE);
$sx = imagesx($bimg);
$sy = imagesy($bimg);
// グラデーション用画像を作成
$img = imagecreate($sx, $sy);
imagesavealpha($img, true);
imagealphablending($img, false);
// 半透明グラデーションを作成
$c1 = 0xffff10;
$c2 = 0x3070a0;
for($ly=0;$ly<$sy;$ly++){
  $r1 = ($c1 >> 16) & 0xff;
  $g1 = ($c1 >> 8 ) & 0xff;
  $b1 = $c1 & 0xff;
  $r2 = ($c2 >> 16) & 0xff;
  $g2 = ($c2 >> 8 ) & 0xff;
  $b2 = $c2 & 0xff;
  $ro = $r1 + round(($r2 - $r1)/$sy*$ly);
  $go = $g1 + round(($g2 - $g1)/$sy*$ly);
  $bo = $b1 + round(($b2 - $b1)/$sy*$ly);
  for($lx=0;$lx<$sx;$lx++){
    imagesetpixel($img, $lx, $ly,
      imagecolorresolve($img, $ro, $go, $bo));
  }
}

// 重ね合わせ
imagecopymerge($bimg, $img, 0, 0, 0, 0, $sx, $sy, 50);

// ファイル出力
imagepng($bimg, "gd_test4.png");
// 開放
imagedestroy($bimg);
imagedestroy($img);
?>
<img src="gd_test4.png" /><br />
</body>
</html>


import javax.imageio.*
import net.coobird.thumbnailator.*

Thumbnails.of(new File("SF.JPG"))
  .size(150, 150)
  .watermark(Positions.BOTTOM_RIGHT,
     ImageIO.read(new File("yourlogo.png")),
     0.7f)
  .toFile(new File("SF_WATERMARK.JPG"))


<!DOCTYPE html PUBLIC "-//W3C//DTD XHTML 1.0 Strict//EN"
  "http://www.w3.org/TR/xhtml1/DTD/xhtml1-strict.dtd">
<html xmlns="http://www.w3.org/1999/xhtml" lang="ja"
  xml:lang="ja" dir="ltr">
<head>
<title>gd_test3</title>
</head>
<body>
<?php
$sx = 200;
$sy = 200;
$img = imagecreatetruecolor($sx, $sy);
imagesavealpha($img, true);
imagealphablending($img, false);
// 半透明グラデーションを作成
$c1 = 0x007799dd;
$c2 = 0x80ffffff;
for($ly=0;$ly<$sy;$ly++){
  $a1 = ($c1 >> 24) & 0xff;
  $r1 = ($c1 >> 16) & 0xff;
  $g1 = ($c1 >> 8 ) & 0xff;
  $b1 = $c1 & 0xff;
  $a2 = ($c2 >> 24) & 0xff;
  $r2 = ($c2 >> 16) & 0xff;
  $g2 = ($c2 >> 8 ) & 0xff;
  $b2 = $c2 & 0xff;
  $ao = $a1 + round(($a2 - $a1)/$sy*$ly);
  $ro = $r1 + round(($r2 - $r1)/$sy*$ly);
  $go = $g1 + round(($g2 - $g1)/$sy*$ly);
  $bo = $b1 + round(($b2 - $b1)/$sy*$ly);
  for($lx=0;$lx<$sx;$lx++){
    imagesetpixel($img, $lx, $ly,
      imagecolorresolvealpha($img, $ro, $go, $bo, $ao));
  }
}
// ファイル出力
imagepng($img, "gd_test3.png", 0);
// 開放
imagedestroy($img);
?>
<img src="gd_test3.png" /><br />
</body>
</html>

import net.coobird.thumbnailator.*

Thumbnails.of(new File("SF.JPG"))
  .size(150, 150)
  .rotate(20d)
  .toFile(new File("ROTATED_SF.JPG"))

