Showing posts with label その他. Show all posts

Wednesday, March 12, 2008

ImageMagickで、複数の画像を含んだPDFを生成する

複数の画像を含んだPDFを生成するには、以下のバッチファイルのように
-adjoinオプションを使用します。

rem 環境によって変えてね
set im=C:\Progra~1\ImageMagick-6.3.8-Q16
%im%\convert.exe sf.jpg sf2.jpg -adjoin sample334b.pdf

元画像1(sf.jpg)


元画像2(sf.jpg)


出力ファイル(sample334b.pdf)

Tuesday, February 19, 2008

ImageMagickで、乱数のシード値を設定する

-seedオプションで乱数のシード値を設定できます。

rem 環境によって変えてね
set im=C:\Progra~1\ImageMagick-6.3.8-Q16
%im%\convert.exe -seed 65535 -size 200x200 plasma:fractal sample313a.png

出力画像(sample313a.png)


関連項目
ImageMagickで、画像に半透明の濃淡をつけて重ね合わせる

Tuesday, February 12, 2008

ImageMagickで、qualityの設定・取得をする

出力画像のqualityを指定するには、-qualityオプションを使用します。

rem 環境によって変えてね
set im=C:\Progra~1\ImageMagick-6.3.7-Q16
%im%\convert.exe sf.jpg -quality 10 sample306.jpg

上記のバッチファイルでは、画質を10に設定しています(0-100の間で指定します)

元画像(sf.jpg)


出力画像(sample306.jpg)


qualityを取得するには、以下のコマンドを実行します。
%im%\identify.exe -format "%%Q" sample306.jpg

Friday, May 11, 2007

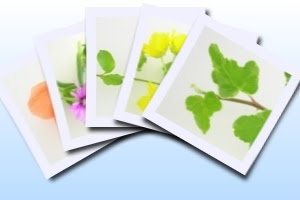
ImageMagickとVBS(WSH)でポラロイド写真を並べた画像を生成する

ImageMagickとVBS(WSH)でポラロイド写真を並べた画像を生成するには、
以下のpolaroids.vbsを実行します。

cscript polaroids.vbs sample156.jpg sample3b.jpg sample4.jpg sample5.jpg sample6.jpg sample9b.jpg
polaroids.vbs
----------------------------------------------------------------------------
Set im = CreateObject("ImageMagickObject.MagickImage.1")
pi=3.14159
rem 開始角
sa=-30
rem 終了角
ea=30
rem 半径
rad=150
rem 出力サイズx
ox=300
oy=200

da=abs(sa-ea)/(WScript.Arguments.Count-2)
WScript.StdOut.WriteLine da
ra = sa
ofile = WScript.Arguments(0)


im.Convert "-size", ox & "x" & oy, "gradient:#ffffff-#bbddff", ofile
For wl=1 to WScript.Arguments.Count -1
infile = WScript.Arguments(wl)
outfile = WScript.Arguments(wl) & ".png"
WScript.StdOut.WriteLine "infile:" & infile
WScript.StdOut.WriteLine "outfile:" & outfile
WScript.StdOut.WriteLine "ra:" & ra
im.Convert infile, "-background", "none", "-polaroid", ra, "+repage", outfile

gx = int(rad * cos(2*pi*(ra+270)/360))
gy = int(rad * sin(2*pi*(ra+270)/360))
width = im.identify("-format", "%w", outfile)
height = im.identify("-format", "%h", outfile)
WScript.StdOut.WriteLine "width:" & width
agx = gx -width/2 +ox/2
agy = gy -height/3 +oy
if agx > 0 then sgx = "+" & agx else sgx = "" & agx end if
if agy > 0 then sgy = "+" & agy else sgy = "" & agy end if

im.Convert ofile, outfile, "-geometry", sgx & sgy, "-composite", ofile


ra=ra+da
Next
Set im = Nothing
----------------------------------------------------------------------------

出力画像(sample156.jpg)


関連項目
ImageMagickとWSHで、バッジ画像を生成する
ImageMagickで、画像をポラロイド写真風にして、日本語文字列を描画する

Friday, April 06, 2007

ImageMagickとVBで画像の幅・高さを取得する

ImageMagickとVBで画像の幅・高さを取得するには、
以下のスクリプトを実行します。

Set im = CreateObject("ImageMagickObject.MagickImage.1")
width = im.identify("-format", "%w", "sample7.jpg")
WScript.StdOut.WriteLine "width:" & width
height = im.identify("-format", "%h", "sample7.jpg")
WScript.StdOut.WriteLine "height:" & height
Set im = Nothing

入力画像(sample7.jpg)

実行結果:
Microsoft (R) Windows Script Host Version 5.6
Copyright (C) Microsoft Corporation 1996-2001. All rights reserved.
width:150

Sunday, March 04, 2007

ImageMagickで画像の幅・高さを取得する

ImageMagickで画像の幅・高さを取得するには、
identifyコマンドを使用します。-formatオプションで
出力書式を指定できます。
%wが幅、%hが高さです。

rem 環境によって変えてね
set im=C:\Progra~1\ImageMagick-6.3.2-Q16
%im%\identify.exe -format "%%w %%h" sample7.jpg

出力結果
>C:\Progra~1\ImageMagick-6.3.2-Q16\identify.exe -format "%w %h" sample7.jpg
150 100

関連項目
ImageMagickとVBで画像の幅・高さを取得する

Saturday, March 03, 2007

ImageMagickとVB Scriptを使用して複数画像を処理する

ImageMagickとVB Script(WSH)を使用して複数画像を処理することもできます。

以下のスクリプト(cv.vbs)では、指定されたディレクトリ内のすべての画像に
ロゴ画像を右下に重ね合わせます。
使用方法はコマンドプロンプトから以下のコマンドを実行します。
cscript cv.vbs <入力ディレクトリへのフルパス> <出力ディレクトリへのフルパス>


cv.vbs
--------------------------------------------------------------------------
WScript.StdOut.WriteLine "source directory:" + WScript.Arguments(0)
WScript.StdOut.WriteLine "output directory:" + WScript.Arguments(1)

im = "C:\Progra~1\ImageMagick-6.3.2-Q16\convert.exe"
opts = "yourlogo.png -gravity southeast -composite"

Set objShell = WScript.CreateObject("WScript.Shell")
Set objFSO = WScript.CreateObject("Scripting.FileSystemObject")
Set objFolder = objFSO.GetFolder(WScript.Arguments(0))
for each objFile In objFolder.Files
WScript.StdOut.WriteLine "found:" & objFile
cs = im &amp;amp; " " & objFile.path & " " & opts & " " & WScript.Arguments(1) & "\" & objFile.name
WScript.StdOut.WriteLine "processing an image..."
Set objExec = objShell.Exec(cs)
Do While objExec.Status = 0
WScript.Sleep 100
Loop
WScript.StdOut.WriteLine "result:" & objExec.ExitCode
next
--------------------------------------------------------------------------
オプション用の変数(opts)を変更することで、他の画像処理を一度に実行することができます。

サンプル入力画像


重ねあわせ画像(yourlogo.png)


サンプル出力画像


関連項目
ImageMagickとWSHで、バッジ画像を生成する