ImageMagickでちょっと傾けた鏡面映り込みを
作成するには、以下のバッチファイルを実行します。
rem 環境によって変えてね
set im=C:\Progra~1\ImageMagick-6.3.1-Q16
rem 反転&半透明グラデーションをかけて
%im%\convert.exe sample4.jpg -bordercolor #c0c0c0 -border 1x1 -channel A -fx "u!=0?(j/h)*0.6:0" -flip sample4t.png
rem 縦に連結+傾け
%im%\convert.exe sample4.jpg -bordercolor #c0c0c0 -border 1x1 sample4t.png -append -background none -shear 0x5 -gravity center -extent 220x220 sample79a.png
rem jpgで出力
%im%\convert.exe -size 220x220 xc:black sample79a.png -composite sample79b.jpg
背景色を変更したい場合は最後の「jpgで出力」のxc:blackの部分を変えます。
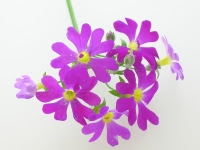
元画像(sample4.jpg)
Saturday, February 17, 2007
Friday, February 16, 2007
ImageMagickで角丸四角の影付き枠線を描画する
ImageMagickで角丸四角の影付き枠線を描画するには、
以下のバッチファイルを実行します。
rem 環境によって変えてね
set im=C:\Progra~1\ImageMagick-6.3.1-Q16
%im%\convert.exe -size 100x100 xc:none -stroke #ccddff -fill none -draw "stroke-width 2 roundrectangle 5,5 95,95 10,10" ( +clone -background #000000 -shadow 40x3+2+2 ) +swap -background white -mosaic sample78.gif
出力画像(sample78.gif)
Thursday, February 15, 2007
ImageMagickで画像を角丸四角に切り取って端折処理する
ImageMagickで画像を角丸に切り取って端折処理するには、
以下のバッチファイルを実行します。
rem 環境によって変えてね
set im=C:\Progra~1\ImageMagick-6.3.1-Q16
rem マスクを作って
%im%\convert.exe -size 40x40 xc:none -matte -channel RGBA -fill #ffffffff -draw "roundrectangle 0,0 60,60 20,20" -fx "(i+j)>40?0:u" mask.png
rem グラデーションを作って
%im%\convert.exe -size 60x60 gradient:#ffffff-#d0d0d0 -rotate -45 -crop 40x40+20+20 grad1.png
rem 重ね合わせ+厚み表現のための線を描画
%im%\convert.exe -size 40x40 grad1.png mask.png -compose dst_in -composite -stroke #ffffffff -fill none -draw "roundrectangle 0,0 60,60 20,20" dogear.png
rem 角丸四角切り取りのためのマスク
%im%\convert.exe -size 200x150 -matte -channel RGBA xc:none -background none -fill white -stroke white -draw "roundrectangle 0,0 199,149 20,20" mask2.png
rem 角丸四角切り取り
%im%\convert.exe -size 200x150 sample1.jpg -matte mask2.png -compose dst_in -composite clipped.png
rem 角丸四角から右下を削って折り曲がった部分を重ねる
%im%\convert.exe -size 200x150 clipped.png -matte -channel RGBA -fx "(i+j)>(180+130)?0:u" dogear.png -geometry +160+110 -compose atop -composite sample77a.gif
rem ついでに影つけ
%im%\convert.exe -size 200x150 xc:white sample77a.gif ( +clone -background #000000 -shadow 40x2+3+3 ) +swap -mosaic sample77b.jpg
元画像(sample1.jpg)
出力画像(sample77b.jpg)
Wednesday, February 14, 2007
ImageMagickで文字列がぼやけていくGIFアニメーションを作成する
文字がぼやけていくGIFアニメーションを作成するには
以下のバッチファイルを実行します。
rem 環境によって変えてね
set im=C:\Progra~1\ImageMagick-6.3.1-Q16
%im%\convert.exe -size 100x100 xc:white -fill black -draw "font-size 18 text 20,55 'Sample'" f1.gif
%im%\convert.exe -size 100x100 xc:white -fill black -draw "font-size 18 text 20,55 'Sample'" -blur 0x1 f2.gif
%im%\convert.exe -size 100x100 xc:white -fill black -draw "font-size 18 text 20,55 'Sample'" -blur 0x2 f3.gif
%im%\convert.exe -size 100x100 xc:white -fill black -draw "font-size 18 text 20,55 'Sample'" -blur 0x3 f4.gif
%im%\convert.exe -size 100x100 xc:white -fill black -draw "font-size 18 text 20,55 'Sample'" -blur 0x4 f5.gif
%im%\convert.exe -size 100x100 xc:white -fill black -draw "font-size 18 text 20,55 'Sample'" -blur 0x5 f6.gif
%im%\convert.exe -size 100x100 xc:white -fill black -draw "font-size 18 text 20,55 'Sample'" -blur 0x7 f7.gif
%im%\convert.exe -size 100x100 xc:white -fill black -draw "font-size 18 text 20,55 'Sample'" -blur 0x9 f8.gif
%im%\convert.exe -size 100x100 xc:white -fill black -draw "font-size 18 text 20,55 'Sample'" -blur 0x12 f9.gif
%im%\convert.exe -size 100x100 xc:white -fill black -draw "font-size 18 text 20,55 'Sample'" -blur 0x20 f10.gif
%im%\convert.exe f1.gif f2.gif f3.gif f4.gif f5.gif f6.gif f7.gif f8.gif f9.gif f10.gif -set delay 20 -loop 0 sample76.gif
出力画像(sample76.gif)
Tuesday, February 13, 2007
ImageMagickで透明な文字列を描画する
以下の方法で透明な文字列を描画することもできます。
rem 環境によって変えてね
set im=C:\Progra~1\ImageMagick-6.3.1-Q16
%im%\convert.exe -size 100x100 xc:none -fill white +antialias -draw "font-size 18 text 0,55 'Transparent'" -channel RGBA -negate -fx "p!=1?0:#fad759" sample76a.gif
元画像(sample1.jpg)
出力画像(sample76a.gif)
他の画像と重ね合わせると、字の部分が透けます。
%im%\convert.exe sample1.jpg sample76a.gif -geometry +50+25 -composite sample76b.png
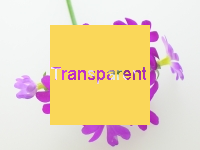
出力画像(sample76b.png)
今度は、半透明の黒背景に透明な文字列の画像を生成します。
%im%\convert.exe -size 100x100 xc:#00000080 -channel RGBA -fill #000000ff +antialias -draw "font-size 18 text 0,55 'Transparent'" -fx "p==#000000?0:p" sample76c.png
出力画像(sample76c.png)
Monday, February 12, 2007
ImageMagickで画像をスケッチ画調に処理する
Sunday, February 11, 2007
ImageMagickで画像を昔の写真風にする
Subscribe to:
Posts (Atom)