Imagickで画像の四隅にネジを描画するには、以下のコードを実行します。
<!DOCTYPE html PUBLIC "-//W3C//DTD XHTML 1.0 Strict//EN"
  "http://www.w3.org/TR/xhtml1/DTD/xhtml1-strict.dtd">
<html xmlns="http://www.w3.org/1999/xhtml" lang="ja"
  xml:lang="ja" dir="ltr">
<head>
<title>sample1151(ImageMagick6.5.2)</title>
</head>
<body>
<?php
/* スクリューの半径 */
$sr = 10;
/* 余白 */
$pad = 5;
/* 塗りつぶし色 */
$fc = "#eeeeee";

/* 円を描画 */
$im = new Imagick();
$im->newImage($sr*2+$pad*2, $sr*2+$pad*2, "none");
$im->setImageMatte(true);
$idraw = new ImagickDraw();
$idraw->setFillColor($fc);
$idraw->ellipse($sr+$pad,$sr+$pad,$sr,$sr,0,360);
$im->drawImage($idraw);

/* 直線部分を透明にする */
$im2 = new Imagick();
$im2->newImage($sr*2+$pad*2, $sr*2+$pad*2, "none");
$im2->setImageMatte(true);
$idraw2 = new ImagickDraw();
$idraw2->setStrokeColor($fc);
$idraw2->setStrokeWidth(3);
$idraw2->line(0,$im2->getImageHeight()/2,
  $im2->getImageWidth(), $im2->getImageHeight()/2);
$im2->drawImage($idraw2);
$im2->negateImage(false);

$im2->compositeImage($im,
 Imagick::COMPOSITE_SRCIN, 0, 0, Imagick::CHANNEL_ALL);

/* 左上ねじ */
$im3 = $im2->clone();
$im3->rotateImage('none', rand(0,360));
$im3->cropImage($im2->getImageWidth(),
  $im2->getImageHeight(),
  ($im3->getImageWidth() - $im2->getImageWidth())/2,
  ($im3->getImageHeight() - $im2->getImageHeight())/2
);

/* 右上ねじ */
$im4 = $im2->clone();
$im4->rotateImage('none', rand(0,360));
$im4->cropImage($im2->getImageWidth(),
  $im2->getImageHeight(),
  ($im4->getImageWidth() - $im2->getImageWidth())/2,
  ($im4->getImageHeight() - $im2->getImageHeight())/2
);

/* 左下ねじ */
$im5 = $im2->clone();
$im5->rotateImage('none', rand(0,360));
$im5->cropImage($im2->getImageWidth(),
  $im2->getImageHeight(),
  ($im5->getImageWidth() - $im2->getImageWidth())/2,
  ($im5->getImageHeight() - $im2->getImageHeight())/2
);

/* 右下ねじ */
$im6 = $im2->clone();
$im6->rotateImage('none', rand(0,360));
$im6->cropImage($im2->getImageWidth(),
  $im2->getImageHeight(),
  ($im6->getImageWidth() - $im2->getImageWidth())/2,
  ($im6->getImageHeight() - $im2->getImageHeight())/2
);

/* ねじ画像を重ねあわせ */
$im7 = new Imagick("sf.jpg");
$im7->compositeImage($im3, Imagick::COMPOSITE_OVER,
  0, 0, Imagick::CHANNEL_ALL);
$im7->compositeImage($im4, Imagick::COMPOSITE_OVER,
  $im7->getImageWidth()-$im4->getImageWidth(), 0,
  Imagick::CHANNEL_ALL);
$im7->compositeImage($im5, Imagick::COMPOSITE_OVER,
  0, $im7->getImageHeight()-$im5->getImageHeight(),
  Imagick::CHANNEL_ALL);
$im7->compositeImage($im6, Imagick::COMPOSITE_OVER,
  $im7->getImageWidth()-$im6->getImageWidth(),
  $im7->getImageHeight()-$im6->getImageHeight(),
  Imagick::CHANNEL_ALL);

$im7->writeImage('sample1151a.png');

$idraw2->destroy();
$idraw->destroy();
$im7->destroy();
$im6->destroy();
$im5->destroy();
$im4->destroy();
$im3->destroy();
$im2->destroy();
$im->destroy();
?>
<img src="sample1151a.png" /><br />

</body>
</html>
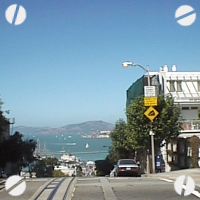
元画像(sf.jpg)

出力画像(sample1151a.png)