Thursday, May 31, 2007

ImageMagickで特定の色調のモノトーンビデオ風画像に変換する

ImageMagickで特定の色調のモノトーンビデオ風画像に変換するには、
以下のバッチファイルを実行します。

rem 環境によって変えてね
set im=C:\Progra~1\ImageMagick-6.3.4-Q16
%im%\convert.exe sample8.jpg +contrast +contrast -fx "j%%3!=0?(r*0.8+g*0.8+b*1.4)/3*#7090E0:(r*0.8+g*0.8+b*1.4)/3*0.7*#7090E0" sample168a.png

元画像(sample8.jpg)


出力画像(sample168a.png)

Wednesday, May 30, 2007

ImageMagickで上下左右方向に徐々にモーションブラーをかける

ImageMagickで上下左右方向に徐々にモーションブラーをかけるには、
以下のバッチファイルを実行します。

rem 環境によって変えてね
set im=C:\Progra~1\ImageMagick-6.3.4-Q16
rem 右に徐々にモーションブラー
%im%\convert.exe sample8.jpg -motion-blur 0x20+180 ( sample8.jpg -channel RGBA -fx "i<w*8/10?p:0" -motion-blur 0x10+180 ) ( sample8.jpg -channel RGBA -fx "i<w*6/10?p:0" -motion-blur 0x5+180 ) ( sample8.jpg -channel RGBA -fx "i<w*4/10?p:0" -motion-blur 0x2+180 ) ( sample8.jpg -channel RGBA -fx "i<w*2/10?p:0" ) -flatten sample167a.png

元画像(sample8.jpg)


出力画像(sample167a.png)


rem 左に徐々にモーションブラー
%im%\convert.exe sample8.jpg -motion-blur 0x20+0 ( sample8.jpg -channel RGBA -fx "i>w*2/10?p:0" -motion-blur 0x10+0 ) ( sample8.jpg -channel RGBA -fx "i>w*4/10?p:0" -motion-blur 0x5+0 ) ( sample8.jpg -channel RGBA -fx "i>w*6/10?p:0" -motion-blur 0x2+0 ) ( sample8.jpg -channel RGBA -fx "i>w*8/10?p:0" ) -flatten sample167b.png

出力画像(sample167b.png)

rem 下に徐々にモーションブラー
%im%\convert.exe sample8.jpg -motion-blur 0x20+270 ( sample8.jpg -channel RGBA -fx "j<h*8/10?p:0" -motion-blur 0x10+270 ) ( sample8.jpg -channel RGBA -fx "j<h*6/10?p:0" -motion-blur 0x5+270 ) ( sample8.jpg -channel RGBA -fx "j<h*4/10?p:0" -motion-blur 0x2+270 ) ( sample8.jpg -channel RGBA -fx "j<h*2/10?p:0" ) -flatten sample167c.png

出力画像(sample167c.png)

rem 上に徐々にモーションブラー
%im%\convert.exe sample8.jpg -motion-blur 0x20+90 ( sample8.jpg -channel RGBA -fx "j>h*2/10?p:0" -motion-blur 0x10+90 ) ( sample8.jpg -channel RGBA -fx "j>h*4/10?p:0" -motion-blur 0x5+90 ) ( sample8.jpg -channel RGBA -fx "j>h*6/10?p:0" -motion-blur 0x2+90 ) ( sample8.jpg -channel RGBA -fx "j>h*8/10?p:0" ) -flatten sample167d.png

出力画像(sample167d.png)


2008/01/04追記
ver6.3.7では、以下のバッチファイルのように-channelの前に-matteを追加します。

rem 環境によって変えてね
set im=C:\Progra~1\ImageMagick-6.3.7-Q16

rem 右に徐々にモーションブラー
%im%\convert.exe sample8.jpg -motion-blur 0x20+180 ( sample8.jpg
-matte -channel RGBA -fx "i<w*8/10?p:0" -motion-blur 0x10+180 )
( sample8.jpg -matte -channel RGBA -fx "i<w*6/10?p:0" -motion-blur 0x5+180 )
( sample8.jpg -matte -channel RGBA -fx "i<w*4/10?p:0" -motion-blur 0x2+180 )
( sample8.jpg -matte -channel RGBA -fx "i<w*2/10?p:0" ) -flatten sample167a.png

rem 左に徐々にモーションブラー
%im%\convert.exe sample8.jpg -motion-blur 0x20+0 ( sample8.jpg
-matte -channel RGBA -fx "i>w*2/10?p:0" -motion-blur 0x10+0 )
( sample8.jpg -matte -channel RGBA -fx "i>w*4/10?p:0" -motion-blur 0x5+0 )
( sample8.jpg -matte -channel RGBA -fx "i>w*6/10?p:0" -motion-blur 0x2+0 )
( sample8.jpg -matte -channel RGBA -fx "i>w*8/10?p:0" ) -flatten sample167b.png

rem 下に徐々にモーションブラー
%im%\convert.exe sample8.jpg -motion-blur 0x20+270 ( sample8.jpg
-matte -channel RGBA -fx "j<h*8/10?p:0" -motion-blur 0x10+270 )
( sample8.jpg -matte -channel RGBA -fx "j<h*6/10?p:0" -motion-blur 0x5+270 )
( sample8.jpg -matte -channel RGBA -fx "j<h*4/10?p:0" -motion-blur 0x2+270 )
( sample8.jpg -matte -channel RGBA -fx "j<h*2/10?p:0" ) -flatten sample167c.png

rem 上に徐々にモーションブラー
%im%\convert.exe sample8.jpg -motion-blur 0x20+90 ( sample8.jpg
-matte -channel RGBA -fx "j>h*2/10?p:0" -motion-blur 0x10+90 )
( sample8.jpg -matte -channel RGBA -fx "j>h*4/10?p:0" -motion-blur 0x5+90 )
( sample8.jpg -matte -channel RGBA -fx "j>h*6/10?p:0" -motion-blur 0x2+90 )
( sample8.jpg -matte -channel RGBA -fx "j>h*8/10?p:0" ) -flatten sample167d.png

関連項目
ImageMagickで上下左右に画像を徐々にぼかす


Monday, May 28, 2007

ImageMagickで画像を角丸四角に切り取って点線が回転するGIFアニメーションを作成する

ImageMagickで画像を角丸四角に切り取って、
点線が回転するGIFアニメーションを作成するには、
以下のバッチファイルを実行します。


rem 環境によって変えてね
set im=C:\Progra~1\ImageMagick-6.3.4-Q16
%im%\convert.exe -size 100x100 xc:none -fill white -draw "roundrectangle 1,1 98,98 10,10" sample3b.jpg -compose srcin -composite -strokewidth 2 -fill none -stroke #c0b49d -draw "stroke-dasharray 4,4 roundrectangle 2,2 97,97 10,10" f1.png
%im%\convert.exe -size 100x100 xc:none -fill white -draw "roundrectangle 1,1 98,98 10,10" sample3b.jpg -compose srcin -composite -strokewidth 2 -fill none -stroke #c0b49d -draw "stroke-dasharray 4,4 stroke-dashoffset 1 roundrectangle 2,2 97,97 10,10" f2.png
%im%\convert.exe -size 100x100 xc:none -fill white -draw "roundrectangle 1,1 98,98 10,10" sample3b.jpg -compose srcin -composite -strokewidth 2 -fill none -stroke #c0b49d -draw "stroke-dasharray 4,4 stroke-dashoffset 2 roundrectangle 2,2 97,97 10,10" f3.png
%im%\convert.exe -size 100x100 xc:none -fill white -draw "roundrectangle 1,1 98,98 10,10" sample3b.jpg -compose srcin -composite -strokewidth 2 -fill none -stroke #c0b49d -draw "stroke-dasharray 4,4 stroke-dashoffset 3 roundrectangle 2,2 97,97 10,10" f4.png
%im%\convert.exe -size 100x100 xc:none -fill white -draw "roundrectangle 1,1 98,98 10,10" sample3b.jpg -compose srcin -composite -strokewidth 2 -fill none -stroke #c0b49d -draw "stroke-dasharray 4,4 stroke-dashoffset 4 roundrectangle 2,2 97,97 10,10" f5.png
%im%\convert.exe -size 100x100 xc:none -fill white -draw "roundrectangle 1,1 98,98 10,10" sample3b.jpg -compose srcin -composite -strokewidth 2 -fill none -stroke #c0b49d -draw "stroke-dasharray 4,4 stroke-dashoffset 5 roundrectangle 2,2 97,97 10,10" f6.png
%im%\convert.exe -size 100x100 xc:none -fill white -draw "roundrectangle 1,1 98,98 10,10" sample3b.jpg -compose srcin -composite -strokewidth 2 -fill none -stroke #c0b49d -draw "stroke-dasharray 4,4 stroke-dashoffset 6 roundrectangle 2,2 97,97 10,10" f7.png
%im%\convert.exe -size 100x100 xc:none -fill white -draw "roundrectangle 1,1 98,98 10,10" sample3b.jpg -compose srcin -composite -strokewidth 2 -fill none -stroke #c0b49d -draw "stroke-dasharray 4,4 stroke-dashoffset 7 roundrectangle 2,2 97,97 10,10" f8.png
%im%\convert.exe -set delay 10 f1.png f2.png f3.png f4.png f5.png f6.png f7.png f8.png -loop 0 sample165.gif
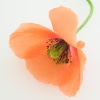
元画像(sample3b.jpg)


出力画像(sample165.gif)

Sunday, May 27, 2007

ImageMagickで上下左右に画像を徐々にぼかす

ImageMagickで上下左右に画像を徐々にぼかすには、
以下のバッチファイルを実行します。

rem 環境によって変えてね
set im=C:\Progra~1\ImageMagick-6.3.4-Q16
rem 右にぼかしていく場合
%im%\convert.exe sample8.jpg -blur 0x4 ( sample8.jpg -channel RGBA -fx "i<w*8/10?p:0" -blur 0x3 ) ( sample8.jpg -channel RGBA -fx "i<w*6/10?p:0" -blur 0x2 ) ( sample8.jpg -channel RGBA -fx "i<w*4/10?p:0" -blur 0x1 ) ( sample8.jpg -channel RGBA -fx "i<w*2/10?p:0" ) -flatten sample164a.png

元画像(sample8.jpg)


出力画像(sample164a.png)

rem 左にぼかしていく場合
%im%\convert.exe sample8.jpg -blur 0x4 ( sample8.jpg -channel RGBA -fx "i>w*2/10?p:0" -blur 0x3 ) ( sample8.jpg -channel RGBA -fx "i>w*4/10?p:0" -blur 0x2 ) ( sample8.jpg -channel RGBA -fx "i>w*6/10?p:0" -blur 0x1 ) ( sample8.jpg -channel RGBA -fx "i>w*8/10?p:0" ) -flatten sample164b.png

出力画像(sample164b.png)


rem 下にぼかしていく場合
%im%\convert.exe sample8.jpg -blur 0x4 ( sample8.jpg -channel RGBA -fx "j<h*8/10?p:0" -blur 0x3 ) ( sample8.jpg -channel RGBA -fx "j<h*6/10?p:0" -blur 0x2 ) ( sample8.jpg -channel RGBA -fx "j<h*4/10?p:0" -blur 0x1 ) ( sample8.jpg -channel RGBA -fx "j<h*2/10?p:0" ) -flatten sample164c.png

出力画像(sample164c.png)


rem 上にぼかしていく場合
%im%\convert.exe sample8.jpg -blur 0x4 ( sample8.jpg -channel RGBA -fx "j>h*2/10?p:0" -blur 0x3 ) ( sample8.jpg -channel RGBA -fx "j>h*4/10?p:0" -blur 0x2 ) ( sample8.jpg -channel RGBA -fx "j>h*6/10?p:0" -blur 0x1 ) ( sample8.jpg -channel RGBA -fx "j>h*8/10?p:0" ) -flatten sample164d.png

出力画像(sample164d.png)


2008/01/04追記
ver6.3.7では、以下のバッチファイルを実行します。 -channel RGBAの前に-matteを追加しています。

rem 環境によって変えてね
set im=C:\Progra~1\ImageMagick-6.3.7-Q16

rem 右にぼかしていく場合
%im%\convert.exe sample8.jpg -blur 0x4 ( sample8.jpg -matte -channel RGBA
-fx "i<w*8/10?p:0" -blur 0x3 ) ( sample8.jpg -matte -channel RGBA
-fx "i<w*6/10?p:0" -blur 0x2 ) ( sample8.jpg -matte -channel RGBA
-fx "i<w*4/10?p:0" -blur 0x1 ) ( sample8.jpg -matte -channel RGBA
-fx "i<w*2/10?p:0" ) -flatten sample164a.png

rem 左にぼかしていく場合
%im%\convert.exe sample8.jpg -blur 0x4 ( sample8.jpg -matte -channel RGBA
-fx "i>w*2/10?p:0" -blur 0x3 ) ( sample8.jpg -matte -channel RGBA
-fx "i>w*4/10?p:0" -blur 0x2 ) ( sample8.jpg -matte -channel RGBA
-fx "i>w*6/10?p:0" -blur 0x1 ) ( sample8.jpg -matte -channel RGBA
-fx "i>w*8/10?p:0" ) -flatten sample164b.png

rem 下にぼかしていく場合
%im%\convert.exe sample8.jpg -blur 0x4 ( sample8.jpg -matte -channel RGBA
-fx "j<h*8/10?p:0" -blur 0x3 ) ( sample8.jpg -matte -channel RGBA
-fx "j<h*6/10?p:0" -blur 0x2 ) ( sample8.jpg -matte -channel RGBA
-fx "j<h*4/10?p:0" -blur 0x1 ) ( sample8.jpg -matte -channel RGBA
-fx "j<h*2/10?p:0" ) -flatten sample164c.png

rem 上にぼかしていく場合
%im%\convert.exe sample8.jpg -blur 0x4 ( sample8.jpg -matte -channel RGBA
-fx "j>h*2/10?p:0" -blur 0x3 ) ( sample8.jpg -matte -channel RGBA
-fx "j>h*4/10?p:0" -blur 0x2 ) ( sample8.jpg -matte -channel RGBA
-fx "j>h*6/10?p:0" -blur 0x1 ) ( sample8.jpg -matte -channel RGBA
-fx "j>h*8/10?p:0" ) -flatten sample164d.png