Saturday, March 08, 2008

ImageMagickで、写真を虹色の濃淡画像に変換する

写真を虹色の濃淡画像に変換するには、以下のバッチファイルを実行します。

rem 環境によって変えてね
set im=C:\Progra~1\ImageMagick-6.3.8-Q16
%im%\convert.exe sf.jpg -fx "luminosity" ( -size 1x1 xc:blue xc:green xc:yellow xc:red -append -matte -channel a -fx "0.5" -channel rgba -resize 200x200! ) -composite sample331.png

元画像(sf.jpg)


出力画像(sample331.png)


2008/07/13追記
ver6.4.0あたりからluminosityからlightnessに変わったので、以下のバッチを実行します。
rem 環境によって変えてね
set im=C:\Progra~1\ImageMagick-6.4.2-Q16
%im%\convert.exe sf.jpg -fx "lightness" ( -size 1x1 xc:blue xc:green xc:yellow xc:red -append -matte -channel a -fx "0.5" -channel rgba -resize 200x200! ) -composite sample331.png

Thursday, March 06, 2008

ImageMagickで、マスクした部分を白黒に変換する

マスクした部分を白黒に変換するには、以下のバッチファイルを実行します。

rem 環境によって変えてね
set im=C:\Progra~1\ImageMagick-6.3.8-Q16
%im%\convert.exe sf.jpg -matte -channel rgba ( mask.bmp -matte -channel a -fx "p.r" -channel rgba ) -compose dst_in -composite -fx "luminosity" sf.jpg +swap -compose src-over -composite sample330.png

元画像(sf.jpg)


マスク画像(mask.bmp)


出力画像(sample330.png)


2008/07/13追記
ver6.4.0あたりからluminosityからlightnessに変わったので、以下のバッチを実行します。
rem 環境によって変えてね
set im=C:\Progra~1\ImageMagick-6.4.2-Q16
%im%\convert.exe sf.jpg -matte -channel rgba ( mask.bmp -matte -channel a -fx "p.r" -channel rgba ) -compose dst_in -composite -fx "lightness" sf.jpg +swap -compose src-over -composite sample330.png

関連項目
ImageMagickで、青っぽい所以外を白黒にする
JMagickでマスクした部分を白黒にする (JMagickでの同様の処理)
RMagickでマスクした部分を白黒にする (RMagickでの同様の処理)

Wednesday, March 05, 2008

ImageMagickで、画像の上に水滴を描画する

画像の上に水滴を描画するには、以下のバッチファイルを実行します。

rem 環境によって変えてね
set im=C:\Progra~1\ImageMagick-6.3.8-Q16

rem 内側の影を生成
%im%\convert.exe -size 40x40 xc:#808080 -matte -channel rgba ( -size 40x40 xc:none -fill white +antialias -draw "ellipse 20,20,14,14,0,360" -negate -background #00000000 -transparent #000000ff ) ( +clone -shadow 80x4+1+1 ) +swap -mosaic -crop 40x40+0+0 +repage ( -size 40x40 xc:none -draw "ellipse 20,20,14,14,0,360" ) -compose dst_in -composite -matte -channel a -fx "p.r!=0?0.6:0" sample329a.png

rem 半透明グラデーションを傾けて、内側の合成、ハイライトの点を描画
%im%\convert.exe -size 30x30 xc:none -matte -channel rgba -fill gradient:#00000810-#FFFFFF80 -draw "ellipse 15,15,14,14,0,360" -virtual-pixel background -background none -rotate -30 -gravity center -crop 30x30+0+0 +repage sample329a.png -compose overlay -composite -normalize ( -size 30x30 xc:none -fill #FFFFFF -draw "ellipse 10,10,2,2,0,360" -blur 0x1 ) -composite sample329b.png

rem 水滴の外側の影を追加
%im%\convert.exe -size 40x40 xc:white -matte -channel rgba -fill black -draw "ellipse 20,20,14,14,0,360" -blur 0x2 -channel a -fx "p.r" -channel rgba -negate sample329b.png -gravity center -geometry -1-1 -composite sample329c.png
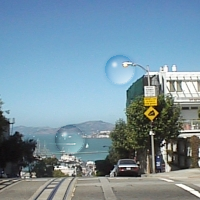
rem 画像と合成
%im%\convert.exe sf.jpg sample329c.png -compose overlay -geometry +100+50 -composite sample329c.png -geometry +50+120 -composite sample329d.png

中間画像1(sample329a.png)内側の影を作成。


中間画像2(sample329b.png)半透明グラデーションを傾けて、内側の合成、ハイライトの点を描画。


中間画像3(Sample329c.png)水滴の外側の影を追加。


出力画像(sample329d.png)

Tuesday, March 04, 2008

ImageMagickで、2値化で切り取った画像に半透明の輪を描画する

2値化で切り取った画像に半透明の輪を描画するには以下のバッチファイルを実行します。

rem 環境によって変えてね
set im=C:\Progra~1\ImageMagick-6.3.8-Q16
%im%\convert.exe -size 100x100 xc:none -matte -channel rgba -fill none -stroke #bbddff80 -strokewidth 5 -draw "ellipse 50,50,45,45,0,360" -virtual-pixel transparent -distort Perspective "0,0 25,25 0,100 -20,75 100,100 120,75 100,0 75,25" ( +clone -fx "j>=h/2?p:0" -write sample328b.png ) +delete -fx "j<h/2?p:0" sample328a.png
%im%\convert.exe sample5r.jpg -threshold 53000 -negate -matte -channel rgba -fill #00000000 -transparent #000000ff sample5r.jpg -compose src_in -composite sample328a.png +swap -compose src_over -composite sample328b.png -composite sample328c.png

元画像(sample5r.jpg)


中間画像(sample328b.png)


中間画像(sample328a.png)


出力画像(sample328c.png)

Monday, March 03, 2008

ImageMagickで、画像の端を白黒にする

画像の端を白黒にするには、以下のバッチファイルを実行します。

rem 環境によって変えてね
set im=C:\Progra~1\ImageMagick-6.3.8-Q16
%im%\convert.exe -size 200x200 xc:none -draw "rectangle 10,10 189,189" sf.jpg -compose src_in -composite ( sf.jpg -fx "luminosity" ) +swap -compose src-over -composite sample327a.png

元画像(sf.jpg)


出力画像(sample327a.png)


2008/07/13追記
ver6.4.0あたりからluminosityからlightnessに変わったので、以下のバッチを実行します。
rem 環境によって変えてね
set im=C:\Progra~1\ImageMagick-6.4.2-Q16
%im%\convert.exe -size 200x200 xc:none -draw "rectangle 10,10 189,189" sf.jpg -compose src_in -composite ( sf.jpg -fx "lightness" ) +swap -compose src-over -composite sample327a.png