rem 環境によって変えてね
set im=C:\Progra~1\ImageMagick-6.3.1-Q16
%im%\convert.exe -size 100x100 xc:none -fill white +antialias -draw "font-size 18 text 0,55 'Transparent'" -channel RGBA -negate -fx "p!=1?0:#fad759" sample76a.gif
元画像(sample1.jpg)

出力画像(sample76a.gif)

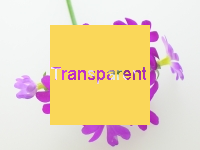
他の画像と重ね合わせると、字の部分が透けます。
%im%\convert.exe sample1.jpg sample76a.gif -geometry +50+25 -composite sample76b.png
出力画像(sample76b.png)

今度は、半透明の黒背景に透明な文字列の画像を生成します。
%im%\convert.exe -size 100x100 xc:#00000080 -channel RGBA -fill #000000ff +antialias -draw "font-size 18 text 0,55 'Transparent'" -fx "p==#000000?0:p" sample76c.png
出力画像(sample76c.png)


No comments:
Post a Comment