Saturday, October 17, 2009

groovyとJOGLで複数の直方体をスプリング状に配置する

groovyとJOGLで複数の直方体をスプリング状に配置するには、以下のコードを実行します。


import static javax.media.opengl.GL.*;
import java.io.*;
import javax.media.opengl.*;
import com.sun.opengl.util.*;

// 出力画像サイズ
width = 300
height = 300

GLDrawableFactory gldf =
GLDrawableFactory.getFactory()
GLCapabilities glc = new GLCapabilities()
glc.setDoubleBuffered(false)
GLPbuffer buf = gldf.createGLPbuffer(
glc, null, width, height, null)
GL gl = buf.getGL()

buf.addGLEventListener(
[ init: {
// 背景色
gl.glClearColor(
0xf0/0xff as Float,
0xf0/0xff as Float,
0xf0/0xff as Float,
1f)
},

display: {
GLUT glut = new GLUT()
gl.glViewport(0, 0, width, height)

// 透視投影
gl.glMatrixMode(GL_PROJECTION)
gl.glLoadIdentity()
float ratio = height/width as Float
gl.glFrustum(-1.0f, 1.0f, -ratio, ratio,
5.0f, 80.0f)

gl.glMatrixMode(GL_MODELVIEW)
gl.glLoadIdentity()
gl.glTranslatef(0.0f, -0.5f, -30.0f)

gl.glEnable(GL_LIGHTING)
gl.glEnable(GL_LIGHT0)
gl.glEnable(GL_COLOR_MATERIAL)
gl.glEnable(GL_NORMALIZE)
gl.glEnable(GL_DEPTH_TEST)
gl.glEnable(GL_CULL_FACE)

gl.glClear(GL_COLOR_BUFFER_BIT
| GL_DEPTH_BUFFER_BIT )

gl.glPushMatrix()

// 面の色を設定
gl.glColor3f(
0x77/0xff as float,
0x99/0xff as float,
0xff/0xff as float
)

// X軸回転
gl.glRotatef(15.0f, 1.0f, 0.0f, 0.0f)
// Y軸回転
gl.glRotatef(70.0f, 0.0f, 1.0f, 0.0f)

cs = 0.5f
gs = 0.05f
for(lx in -100..800-1){
gl.glPushMatrix()
gl.glRotatef(5f*lx as float, 1.0f, 0.0f, 0.0f)
gl.glTranslatef(gs*lx as float, 2f, 0f)
gl.glScalef(1f,1f,0.2f)
glut.glutSolidCube(cs)
gl.glPopMatrix()
}

gl.glPopMatrix()
},

reshape: {},
displayChanged: {}
] as GLEventListener
)
GLContext context =
buf.createContext(null)
context.makeCurrent()
buf.display()
Screenshot.writeToFile(
new File("sample1311a.png"),
width, height, true)
context.release()
context.destroy()


出力画像(sample1311a.png)
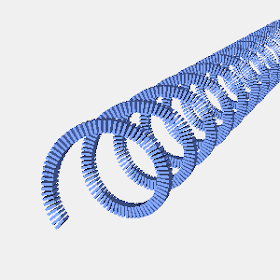
groovyとJOGLで複数の直方体をスプリング状に配置した画像

動作環境
JDK1.6 Update14, Groovy 1.6.3, JOGL 1.1.1a

関連情報
groovyとJOGLのまとめ

Friday, October 16, 2009

groovyとJOGLでスポットライトを使用する

groovyとJOGLでスポットライトを使用するには、以下のコードを実行します。


import static javax.media.opengl.GL.*;
import java.io.*;
import javax.media.opengl.*;
import com.sun.opengl.util.*;

// 出力画像サイズ
width = 300
height = 300

GLDrawableFactory gldf =
GLDrawableFactory.getFactory()
GLCapabilities glc = new GLCapabilities()
glc.setDoubleBuffered(false)
GLPbuffer buf = gldf.createGLPbuffer(
glc, null, width, height, null)
GL gl = buf.getGL()

buf.addGLEventListener(
[ init: {
// 背景色
gl.glClearColor(
0x58/0xff as Float,
0x50/0xff as Float,
0x50/0xff as Float,
1f)
},

display: {
GLUT glut = new GLUT()
gl.glViewport(0, 0, width, height)

// 透視投影
gl.glMatrixMode(GL_PROJECTION)
gl.glLoadIdentity()
float ratio = height/width as Float
gl.glFrustum(-1.0f, 1.0f, -ratio, ratio,
5.0f, 40.0f)

gl.glMatrixMode(GL_MODELVIEW)
gl.glLoadIdentity()
gl.glTranslatef(-3.0f, -1.5f, -7.0f)

gl.glEnable(GL_LIGHTING)
gl.glEnable(GL_LIGHT0)
gl.glEnable(GL_LIGHT1)
gl.glEnable(GL_COLOR_MATERIAL)
gl.glEnable(GL_NORMALIZE)
gl.glEnable(GL_DEPTH_TEST)
gl.glEnable(GL_CULL_FACE)

// フォグの設定
fog=[0.2f,0.2f,0.3f,1.0f]
gl.glFogfv(GL_FOG_COLOR,fog as float[], 0)
gl.glFogi(GL_FOG_MODE,GL.GL_EXP)
gl.glFogf(GL_FOG_DENSITY, 0.04f)
gl.glFogf(GL_FOG_START, 0.0f)
gl.glFogf(GL_FOG_END,20.0f)
gl.glEnable(GL_FOG)

// 光源の位置
l0pos = [-5.0f, 5.0f, 0.0f, 1.0f]
gl.glLightfv(GL_LIGHT0, GL_POSITION, l0pos as float[], 0)
// 環境光
l0amb = [0.1f, 0.1f, 0.1f, 1.0f]
gl.glLightfv(GL_LIGHT0, GL_AMBIENT, l0amb as float[], 0)
// 拡散光
l0dif = [0.2f, 0.2f, 0.2f, 1.0f]
gl.glLightfv(GL_LIGHT0, GL_DIFFUSE, l0dif as float[], 0)
// 鏡面光
l0spe = [0.3f, 0.3f, 0.3f, 1.0f]
gl.glLightfv(GL_LIGHT0, GL_SPECULAR, l0spe as float[], 0)

// 光源の位置
l1pos = [3.0f, 4.0f, -5.0f, 1.0f]
gl.glLightfv(GL_LIGHT1, GL_POSITION, l1pos as float[], 0)
// 環境光
l1amb = [0.2f, 0.2f, 0.1f, 1.0f]
gl.glLightfv(GL_LIGHT1, GL_AMBIENT, l1amb as float[], 0)
// 拡散光
l1dif = [0.5f, 0.5f, 0.3f, 1.0f]
gl.glLightfv(GL_LIGHT1, GL_DIFFUSE, l1dif as float[], 0)
// 鏡面光
l1spe = [0.8f, 0.8f, 0.2f, 1.0f]
gl.glLightfv(GL_LIGHT1, GL_SPECULAR, l1spe as float[], 0)
// スポットライト
l1dir = [0.1f, -1.0f, 0.0f]
gl.glLightfv(GL_LIGHT1, GL_SPOT_DIRECTION, l1dir as float[], 0)
gl.glLightf(GL_LIGHT1, GL_SPOT_CUTOFF, 30.0f)
gl.glLightf(GL_LIGHT1, GL_SPOT_EXPONENT, 5.0f)

gl.glClear(GL_COLOR_BUFFER_BIT
| GL_DEPTH_BUFFER_BIT )

gl.glPushMatrix()

// 面の色を設定
gl.glColor3f(
0xff/0xff as float,
0xff/0xff as float,
0xff/0xff as float
)

// X軸回転
gl.glRotatef(15.0f, 1.0f, 0.0f, 0.0f)
// Y軸回転
gl.glRotatef(30.0f, 0.0f, 1.0f, 0.0f)

cs = 0.4f
gs = 0.5f
xs = 100
zs = 100
for(lz in -3..zs-1){
for(lx in -3..xs-1){
gl.glPushMatrix()
ch = cs * (float)(Math.random()*1.0) as float
gl.glScalef(1f,ch, 1f)
gl.glTranslatef(lx*gs as float,
-(cs-ch)/2 as float, -1*lz*gs as float)
glut.glutSolidCube(cs)
gl.glPopMatrix()
}
}

gl.glPopMatrix()
},

reshape: {},
displayChanged: {}
] as GLEventListener
)
GLContext context =
buf.createContext(null)
context.makeCurrent()
buf.display()
Screenshot.writeToFile(
new File("sample1310a.png"),
width, height, true)
context.release()
context.destroy()


出力画像(sample1310a.png)
groovyとJOGLで描画したスポットライトを使用した画像

動作環境
JDK1.6 Update14, Groovy 1.6.3, JOGL 1.1.1a

関連情報
groovyとJOGLのまとめ

Thursday, October 15, 2009

groovyとJOGLで球状に配置された立方体を描画する

groovyとJOGLで球状に配置された立方体を描画するには、以下のコードを実行します。


import static javax.media.opengl.GL.*;
import java.io.*;
import javax.media.opengl.*;
import com.sun.opengl.util.*;

// 出力画像サイズ
width = 300
height = 300

GLDrawableFactory gldf =
GLDrawableFactory.getFactory()
GLCapabilities glc = new GLCapabilities()
glc.setDoubleBuffered(false)
GLPbuffer buf = gldf.createGLPbuffer(
glc, null, width, height, null)
GL gl = buf.getGL()

buf.addGLEventListener(
[ init: {
// 背景色
gl.glClearColor(
0xf0/0xff as Float,
0xf0/0xff as Float,
0xf0/0xff as Float,
1f)
},

display: {
GLUT glut = new GLUT()
gl.glViewport(0, 0, width, height)

// 透視投影
gl.glMatrixMode(GL_PROJECTION)
gl.glLoadIdentity()
float ratio = height/width as Float
gl.glFrustum(-1.0f, 1.0f, -ratio, ratio,
5.0f, 40.0f)

gl.glMatrixMode(GL_MODELVIEW)
gl.glLoadIdentity()
gl.glTranslatef(0.0f, 0.0f, -22.0f)

gl.glEnable(GL_LIGHTING)
gl.glEnable(GL_LIGHT0)
gl.glEnable(GL_COLOR_MATERIAL)
gl.glEnable(GL_NORMALIZE)
gl.glEnable(GL_DEPTH_TEST)
gl.glEnable(GL_CULL_FACE)

gl.glClear(GL_COLOR_BUFFER_BIT
| GL_DEPTH_BUFFER_BIT )

gl.glPushMatrix()

// 面の色を設定
gl.glColor3f(
0x77/0xff as float,
0x99/0xff as float,
0xff/0xff as float
)

// X軸回転
gl.glRotatef(15.0f, 1.0f, 0.0f, 0.0f)
// Y軸回転
gl.glRotatef(30.0f, 0.0f, 1.0f, 0.0f)
// Z軸回転
gl.glRotatef(60.0f, 0.0f, 0.0f, 1.0f)

slices = 32
rad = 3f
cs = 0.25f

for(ly in 0..slices-1){
for(lz in 0..slices-1){
gl.glPushMatrix()
// Y軸回転
gl.glRotatef(360f/slices*ly as float,
0.0f, 1.0f, 0.0f)
// Z軸回転
gl.glRotatef(360f/slices*lz as float,
0.0f, 0.0f, 1.0f)
gl.glTranslatef(0f, rad, 0f)

glut.glutSolidCube(cs)
gl.glPopMatrix()
}
}

gl.glPopMatrix()
},

reshape: {},
displayChanged: {}
] as GLEventListener
)
GLContext context =
buf.createContext(null)
context.makeCurrent()
buf.display()
Screenshot.writeToFile(
new File("sample1309a.png"),
width, height, true)
context.release()
context.destroy()


出力画像(sample1309a.png)
groovyとJOGLで描画した球状に配置した立方体

動作環境
JDK1.6 Update14, Groovy 1.6.3, JOGL 1.1.1a

関連情報
groovyとJOGLのまとめ

Wednesday, October 14, 2009

groovyとJOGLで複数の直方体を凸凹に配置する

groovyとJOGLで複数の直方体を凸凹に配置するには、以下のコードを実行します。


import static javax.media.opengl.GL.*;
import java.io.*;
import javax.media.opengl.*;
import com.sun.opengl.util.*;

// 出力画像サイズ
width = 300
height = 300

GLDrawableFactory gldf =
GLDrawableFactory.getFactory()
GLCapabilities glc = new GLCapabilities()
glc.setDoubleBuffered(false)
GLPbuffer buf = gldf.createGLPbuffer(
glc, null, width, height, null)
GL gl = buf.getGL()

buf.addGLEventListener(
[ init: {
// 背景色
gl.glClearColor(
0x58/0xff as Float,
0x50/0xff as Float,
0x50/0xff as Float,
1f)
},

display: {
GLUT glut = new GLUT()
gl.glViewport(0, 0, width, height)

// 透視投影
gl.glMatrixMode(GL_PROJECTION)
gl.glLoadIdentity()
float ratio = height/width as Float
gl.glFrustum(-1.0f, 1.0f, -ratio, ratio,
5.0f, 40.0f)

gl.glMatrixMode(GL_MODELVIEW)
gl.glLoadIdentity()
gl.glTranslatef(-3.0f, -1.5f, -7.0f)

gl.glEnable(GL_LIGHTING)
gl.glEnable(GL_LIGHT0)
gl.glEnable(GL_COLOR_MATERIAL)
gl.glEnable(GL_NORMALIZE)
gl.glEnable(GL_DEPTH_TEST)
gl.glEnable(GL_CULL_FACE)

// フォグの設定
fog=[0.1f,0.1f,0.2f,1.0f]
gl.glFogfv(GL_FOG_COLOR,fog as float[], 0)
gl.glFogi(GL_FOG_MODE,GL.GL_EXP)
gl.glFogf(GL_FOG_DENSITY, 0.08f)
gl.glFogf(GL_FOG_START, 0.0f)
gl.glFogf(GL_FOG_END,20.0f)
gl.glEnable(GL_FOG)

// 光源の位置
l1pos = [-5.0f, 5.0f, 0.0f, 1.0f]
gl.glLightfv(GL_LIGHT0, GL_POSITION, l1pos as float[], 0)
// 環境光
l1amb = [0.2f, 0.2f, 0.1f, 1.0f]
gl.glLightfv(GL_LIGHT0, GL_AMBIENT, l1amb as float[], 0)
// 拡散光
l1dif = [0.9f, 0.9f, 0.9f, 1.0f]
gl.glLightfv(GL_LIGHT0, GL_DIFFUSE, l1dif as float[], 0)
// 鏡面光
l1spe = [0.9f, 0.9f, 0.9f, 1.0f]
gl.glLightfv(GL_LIGHT0, GL_SPECULAR, l1spe as float[], 0)

gl.glClear(GL_COLOR_BUFFER_BIT
| GL_DEPTH_BUFFER_BIT )

gl.glPushMatrix()

// 面の色を設定
gl.glColor3f(
0xff/0xff as float,
0xff/0xff as float,
0xff/0xff as float
)

// X軸回転
gl.glRotatef(15.0f, 1.0f, 0.0f, 0.0f)
// Y軸回転
gl.glRotatef(30.0f, 0.0f, 1.0f, 0.0f)

cs = 0.5f
gs = 0.6f
xs = 50
zs = 50
for(lz in -3..zs-1){
for(lx in -3..xs-1){
gl.glPushMatrix()
ch = cs * (float)(Math.random()*1.0) as float
gl.glScalef(1f,ch, 1f)
gl.glTranslatef(lx*gs as float,
-(cs-ch)/2 as float, -1*lz*gs as float)
glut.glutSolidCube(cs)
gl.glPopMatrix()
}
}

gl.glPopMatrix()
},

reshape: {},
displayChanged: {}
] as GLEventListener
)
GLContext context =
buf.createContext(null)
context.makeCurrent()
buf.display()
Screenshot.writeToFile(
new File("sample1308a.png"),
width, height, true)
context.release()
context.destroy()


出力画像(sample1308a.png)
groovyとJOGLで複数の直方体を凸凹に配置した画像

動作環境
JDK1.6 Update14, Groovy 1.6.3, JOGL 1.1.1a

関連情報
groovyとJOGLのまとめ

Tuesday, October 13, 2009

groovyとJOGLで少しずつ回転させた複数の立方体を描画する

groovyとJOGLで少しずつ回転させた複数の立方体を描画するには、以下のコードを実行します。


import static javax.media.opengl.GL.*;
import java.io.*;
import javax.media.opengl.*;
import com.sun.opengl.util.*;

// 出力画像サイズ
width = 300
height = 300

GLDrawableFactory gldf =
GLDrawableFactory.getFactory()
GLCapabilities glc = new GLCapabilities()
glc.setDoubleBuffered(false)
GLPbuffer buf = gldf.createGLPbuffer(
glc, null, width, height, null)
GL gl = buf.getGL()

buf.addGLEventListener(
[ init: {
// 背景色
gl.glClearColor(
0x68/0xff as Float,
0x60/0xff as Float,
0x60/0xff as Float,
1f)
},

display: {
GLUT glut = new GLUT()
gl.glViewport(0, 0, width, height)

// 透視投影
gl.glMatrixMode(GL_PROJECTION)
gl.glLoadIdentity()
float ratio = height/width as Float
gl.glFrustum(-1.0f, 1.0f, -ratio, ratio,
5.0f, 40.0f)

gl.glMatrixMode(GL_MODELVIEW)
gl.glLoadIdentity()
gl.glTranslatef(0.0f, -0.5f, -30.0f)

gl.glEnable(GL_LIGHTING)
gl.glEnable(GL_LIGHT0)
gl.glEnable(GL_COLOR_MATERIAL)
gl.glEnable(GL_NORMALIZE)
gl.glEnable(GL_DEPTH_TEST)
// gl.glEnable(GL_CULL_FACE)
gl.glLightModeli(GL_LIGHT_MODEL_TWO_SIDE,
GL_TRUE)

gl.glEnable(GL_TEXTURE_2D)

gl.glClear(GL_COLOR_BUFFER_BIT
| GL_DEPTH_BUFFER_BIT )

gl.glPushMatrix()

// 面の色を設定
gl.glColor3f(
0x77/0xff as float,
0x99/0xff as float,
0xff/0xff as float
)

// X軸回転
gl.glRotatef(15.0f, 1.0f, 0.0f, 0.0f)
// Y軸回転
gl.glRotatef(20.0f, 0.0f, 1.0f, 0.0f)

px = -7f
py = 0f
pz = 0f
ry = 0f
for(li in 0..19){
gl.glPushMatrix();

gl.glTranslatef(px as float, py, pz)
// X軸回転
gl.glRotatef(ry as float, 1.0f, 0.0f, 0.0f)
glut.glutSolidCube(0.9f)
px += 1f
ry += 10f
gl.glPopMatrix()
}

gl.glPopMatrix()
},

reshape: {},
displayChanged: {}
] as GLEventListener
)
GLContext context =
buf.createContext(null)
context.makeCurrent()
buf.display()
Screenshot.writeToFile(
new File("sample1307a.png"),
width, height, true)
context.release()
context.destroy()


出力画像(sample1307a.png)
groovyとJOGLで描画した複数の立方体を少しずつ回転させた画像

動作環境
JDK1.6 Update14, Groovy 1.6.3, JOGL 1.1.1a

関連情報
groovyとJOGLのまとめ

Monday, October 12, 2009

PyWin32とImageMagickで画像をグレースケールの立体的な角丸四角に変換する

PyWin32とImageMagickで画像をグレースケールの立体的な角丸四角に変換するには、以下のコードを実行します。


# coding=UTF-8
import win32com.client

im = win32com.client.Dispatch("ImageMagickObject.MagickImage.1")
im.convert("-size", "200x200", "xc:none",
"-fill", "white", "-draw", "roundrectangle 10,10,190,190,10,10",
"-matte", "-channel", "rgba", "sf.jpg",
"-compose", "src_in", "-composite", "-modulate", "160",
"-colorspace", "gray", "(", "-size", "200x200", "xc:none",
"-fill", "white", "-draw", "roundrectangle 10,10,190,190,10,10",
"-shade", "135x23", "-blur", "0x2", "-normalize", "-matte",
"-channel", "rgba", ")", "-swap", "0,1", "-compose", "overlay",
"-composite", "sample1340a.png")


出力画像(sample1340a.png)
PyWin32とImageMagickでグレースケールの立体的な角丸四角に貼り付けたように変換した画像

動作環境
Python3.1.1, Python for Windows Extensions (Build 214), ImageMagick6.5.5

groovyとJOGLで画像を放射状に配置する

groovyとJOGLで画像を放射状に配置するには、以下のコードを実行します。


import static javax.media.opengl.GL.*;
import java.io.*;
import javax.media.opengl.*;
import com.sun.opengl.util.*;
import com.sun.opengl.util.texture.*;

// 出力画像サイズ
width = 300
height = 300

fn = [
"sample1182a.png",
"sample1189a.png",
"sample1191a.png",
"sample1194a.png",
"sample1195a.png",
"sample1196a.png",
"sample1197a.png",
"sample1198a.png",
"sample1199a.png",
"sample1201a.png",
"sample1202a.png",
"sample1206a.png"
]
textures = new Texture[fn.size]

GLDrawableFactory gldf =
GLDrawableFactory.getFactory()
GLCapabilities glc = new GLCapabilities()
glc.setDoubleBuffered(false)
GLPbuffer buf = gldf.createGLPbuffer(
glc, null, width, height, null)
GL gl = buf.getGL()

buf.addGLEventListener(
[ init: {
// 背景色
gl.glClearColor(
0x68/0xff as Float,
0x60/0xff as Float,
0x60/0xff as Float,
1f)
for(fi in 0..fn.size-1){
textures[fi] =
TextureIO.newTexture(
new File(fn[fi]), true)
textures[fi].enable();
}
},

display: {
gl.glViewport(0, 0, width, height)

// 透視投影
gl.glMatrixMode(GL_PROJECTION)
gl.glLoadIdentity()
float ratio = height/width as Float
gl.glFrustum(-1.0f, 1.0f, -ratio, ratio,
5.0f, 40.0f)

gl.glMatrixMode(GL_MODELVIEW)
gl.glLoadIdentity()
gl.glTranslatef(0.0f, -0.5f, -12.0f)

gl.glEnable(GL_LIGHTING)
gl.glEnable(GL_LIGHT0)
gl.glEnable(GL_COLOR_MATERIAL)
gl.glEnable(GL_AUTO_NORMAL);
gl.glEnable(GL_NORMALIZE)
gl.glEnable(GL_DEPTH_TEST)
// gl.glEnable(GL_CULL_FACE)
gl.glLightModeli(GL_LIGHT_MODEL_TWO_SIDE,
GL_TRUE)

gl.glEnable(GL_TEXTURE_2D)

gl.glClear(GL_COLOR_BUFFER_BIT
| GL_DEPTH_BUFFER_BIT )

gl.glPushMatrix()

// X軸回転
gl.glRotatef(15.0f, 1.0f, 0.0f, 0.0f)
// Y軸回転
gl.glRotatef(20.0f, 0.0f, 1.0f, 0.0f)

da = 360f / fn.size
ps = 2f
for(qi in 0..fn.size-1){
// テクスチャが張られたポリゴンを描画
textures[qi].bind();
px = ps * (float)Math.cos(
Math.PI * da * qi / 180) as float
pz = ps * (float)Math.sin(
Math.PI * da * qi / 180) as float
nx = ps * (float)Math.cos(
Math.PI * (da * qi+90) / 180) as float
nz = ps * (float)Math.sin(
Math.PI * (da * qi+90) / 180) as float

gl.glBegin(GL_QUADS)
gl.glNormal3f(nx, 0.0f, nz)

gl.glTexCoord2f(0.0f, 0.0f)
gl.glVertex3f(0f, ps/2f as float, 0f)
gl.glTexCoord2f(0.0f, 1.0f)
gl.glVertex3f(0f, -ps/2f as float, 0f)
gl.glTexCoord2f(1.0f, 1.0f)
gl.glVertex3f(px, -ps/2f as float, pz)
gl.glTexCoord2f(1.0f, 0.0f)
gl.glVertex3f(px, ps/2f as float, pz)
gl.glEnd()
}

gl.glPopMatrix()
},

reshape: {},
displayChanged: {}
] as GLEventListener
)
GLContext context =
buf.createContext(null)
context.makeCurrent()
buf.display()
Screenshot.writeToFile(
new File("sample1306a.png"),
width, height, true)
context.release()
context.destroy()


出力画像(sample1306a.png)
groovyとJOGLで放射状に複数の画像を配置した画像

動作環境
JDK1.6 Update14, Groovy 1.6.3, JOGL 1.1.1a

関連情報
groovyとJOGLのまとめ

Sunday, October 11, 2009

groovyとJOGLでポリゴンに繰り返しテクスチャを貼り付ける

groovyとJOGLでポリゴンに繰り返しテクスチャを貼り付けるには、以下のコードを実行します。


import static javax.media.opengl.GL.*;
import java.io.*;
import javax.media.opengl.*;
import com.sun.opengl.util.*;
import com.sun.opengl.util.texture.*;

// 出力画像サイズ
width = 300
height = 300

GLDrawableFactory gldf =
GLDrawableFactory.getFactory()
GLCapabilities glc = new GLCapabilities()
glc.setDoubleBuffered(false)
GLPbuffer buf = gldf.createGLPbuffer(
glc, null, width, height, null)
GL gl = buf.getGL()

buf.addGLEventListener(
[ init: {
// 背景色
gl.glClearColor(
0xf0/0xff as Float,
0xf0/0xff as Float,
0xf0/0xff as Float,
1f)
Texture texture = TextureIO.newTexture(
new File("sf_r.jpg"), true)
texture.enable()
texture.bind()
},

display: {
GLUT glut = new GLUT()
gl.glViewport(0, 0, width, height)

// 透視投影
gl.glMatrixMode(GL_PROJECTION)
gl.glLoadIdentity()
float ratio = height/width as Float
gl.glFrustum(-1.0f, 1.0f, -ratio, ratio,
5.0f, 40.0f)

gl.glMatrixMode(GL_MODELVIEW)
gl.glLoadIdentity()
gl.glTranslatef(0.0f, 0.0f, -15.0f)

gl.glEnable(GL_LIGHTING)
gl.glEnable(GL_LIGHT0)
gl.glEnable(GL_COLOR_MATERIAL)
gl.glEnable(GL_NORMALIZE)
gl.glEnable(GL_DEPTH_TEST)
gl.glEnable(GL_CULL_FACE)

gl.glEnable(GL_TEXTURE_2D)
gl.glEnable(GL_TEXTURE_GEN_S)
gl.glEnable(GL_TEXTURE_GEN_T)

gl.glClear(GL_COLOR_BUFFER_BIT
| GL_DEPTH_BUFFER_BIT )

gl.glPushMatrix()

gl.glTexParameteri(GL_TEXTURE_2D,
GL_TEXTURE_WRAP_S, GL_REPEAT)
gl.glTexParameteri(GL_TEXTURE_2D,
GL_TEXTURE_WRAP_T, GL_REPEAT)

// Y軸回転
gl.glRotatef(30.0f, 0.0f, 1.0f, 0.0f)

// テクスチャが張られたポリゴンを描画
gl.glBegin(GL_POLYGON)
gl.glTexCoord2f(0.0f, 1.0f)
gl.glVertex3f(-2f, -2f, 0.0f)
gl.glTexCoord2f(1.0f, 1.0f)
gl.glVertex3f(2f, -2f, 0.0f)
gl.glTexCoord2f(1.0f, 0.0f)
gl.glVertex3f(2f, 2f, 0.0f)
gl.glTexCoord2f(0.0f, 0.0f)
gl.glVertex3f(-2f, 2f, 0.0f)
gl.glEnd()

gl.glPopMatrix()
},

reshape: {},
displayChanged: {}
] as GLEventListener
)
GLContext context =
buf.createContext(null)
context.makeCurrent()
buf.display()
Screenshot.writeToFile(
new File("sample1305a.png"),
width, height, true)
context.release()
context.destroy()


テクスチャ画像


出力画像(sample1305a.png)
groovyとJOGLで描画した繰り返しテクスチャを貼り付けたポリゴン

動作環境
JDK1.6 Update14, Groovy 1.6.3, JOGL 1.1.1a

関連情報
groovyとJOGLのまとめ