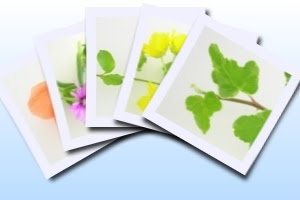
以下のpolaroids.vbsを実行します。
cscript polaroids.vbs sample156.jpg sample3b.jpg sample4.jpg sample5.jpg sample6.jpg sample9b.jpg
polaroids.vbs
----------------------------------------------------------------------------
Set im = CreateObject("ImageMagickObject.MagickImage.1")
pi=3.14159
rem 開始角
sa=-30
rem 終了角
ea=30
rem 半径
rad=150
rem 出力サイズx
ox=300
oy=200
da=abs(sa-ea)/(WScript.Arguments.Count-2)
WScript.StdOut.WriteLine da
ra = sa
ofile = WScript.Arguments(0)
im.Convert "-size", ox & "x" & oy, "gradient:#ffffff-#bbddff", ofile
For wl=1 to WScript.Arguments.Count -1
infile = WScript.Arguments(wl)
outfile = WScript.Arguments(wl) & ".png"
WScript.StdOut.WriteLine "infile:" & infile
WScript.StdOut.WriteLine "outfile:" & outfile
WScript.StdOut.WriteLine "ra:" & ra
im.Convert infile, "-background", "none", "-polaroid", ra, "+repage", outfile
gx = int(rad * cos(2*pi*(ra+270)/360))
gy = int(rad * sin(2*pi*(ra+270)/360))
width = im.identify("-format", "%w", outfile)
height = im.identify("-format", "%h", outfile)
WScript.StdOut.WriteLine "width:" & width
agx = gx -width/2 +ox/2
agy = gy -height/3 +oy
if agx > 0 then sgx = "+" & agx else sgx = "" & agx end if
if agy > 0 then sgy = "+" & agy else sgy = "" & agy end if
im.Convert ofile, outfile, "-geometry", sgx & sgy, "-composite", ofile
ra=ra+da
Next
Set im = Nothing
----------------------------------------------------------------------------
出力画像(sample156.jpg)

関連項目
ImageMagickとWSHで、バッジ画像を生成する
ImageMagickで、画像をポラロイド写真風にして、日本語文字列を描画する


