ImageMagickで一部分だけ焦点のあっている画像に処理するには、
以下のバッチファイルを実行します。
rem 環境によって変えてね
set im=C:\Progra~1\ImageMagick-6.3.4-Q16
%im%\convert.exe -size 200x100 xc:none -fill white -draw "ellipse 50,50 40,40 0,360" sample8.jpg -compose srcin -composite p1.png
%im%\convert.exe -size 200x100 xc:none -fill white -draw "ellipse 50,50 45,45 0,360" sample8.jpg -compose srcin -composite -channel RGBA -blur 0x1 p2.png
%im%\convert.exe -size 200x100 xc:none -fill white -draw "ellipse 50,50 55,55 0,360" sample8.jpg -compose srcin -composite -channel RGBA -blur 0x2 p3.png
%im%\convert.exe -size 200x100 xc:none -fill white -draw "ellipse 50,50 70,70 0,360" sample8.jpg -compose srcin -composite -channel RGBA -blur 0x3 p4.png
%im%\convert.exe sample8.jpg -blur 0x4 p4.png p3.png p2.png p1.png -flatten sample158.png
上記のバッチでは、座標(50,50)を中心とした同心円をそれぞれ切り抜き、ぼかしを外側に向かって
強くかけるようにしています。
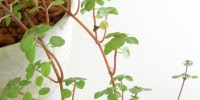
元画像(sample8.jpg)
出力画像(sample158.png)


